Pages

Monday, May 28, 2012

It's Your Bird-Day Card

It's Your Bird-Day!   This birthday card was made using Straight From the Nest Cricut cartridge.   Paper colors from Yummy Imagine Cricut cartridge.  Card accented with twine and stickles.   Flower is from Martha Stewart punch.   Butterfly and bling purchased from dollar sell at Michaels.

There is an Action Wobble under the bird :-) 


Inside of card.   Feather from Straight From the Nest Cricut cartridge and color from Yummy Imagine Cricut cartridge.   Sentiment from My Pink Stamper.

Sunday, May 27, 2012

Let's Play Dress-up

Little time-out stool for Neely painted in a melon color.   The little girl playing dress-up is from A Child's Year Cricut cartirdge.   Font for "Neely" is from Songbird Cricut cartridge.   Flowers are from Accent Essentials Cricut cartridge.   Paper colors are from Imagine More Cards Cricut cartridge.  Stool is accented with ribbon, butterflies, stickles and Glossy Accents.  Green twine used to accent ribbon image on front of dress.


Card has been added. Castle on front of card from Life a Party Cricut cartridge.


Saturday, May 26, 2012

Cowboy Themed Time-Out Stool

Howdy Partner!


Time-out stool for Clive.   Stool is accented with a red bandana and comes with a baby shower card.   Cuts are from A Child's Year and Old West Cricut cartridges.   Blue twine used for the rope and yellow twine adds accent around the sheriff's badge.  Gold stickles used on spurs.   Glossy Accents used on sheriff's badge.

Pretty Pricess Stool for Haley

Pretty Princess Stool for Haley.   Crown and "Pretty Princess" cuts from Life's a Party Cricut cartridge.   Flower cuts from Accent Essentials Cricut cartridge.  "Haley" font from Songbird Cricut cartridge.   Accented with stickles, glossy accents, tulle and butterlies.

Sunday, May 13, 2012

Explosion Box - Photos

I made this explosion box with photos for my mother on Mother's Day.  

Explosion Box folded up with lid.  Bow not needed to hold close - used for decorative purposes only.
The concept is simple enough :

1.   12" x 12" card stock (two sided is best).   Score at 4" on all sides; cut out the 4 inch squares from all four corners.
2.  11" x 11" card stock.   Score at 3.75" on all sides; cut out the four corners.
3.  10" x 10" card stock.   Score at 3.5" on all sides; cut out the four corners.
4.  Lid is 8.125" x 8.125" card stock.  Score at 2" on all sides.   Slit at two ends and create box lid.
5.   Attach the other 3 card stocks together and decorate (I used photos).
6.  Fold up to create box bottom and attach lid.

Want a .svg of this?   Leave a comment with instructions on where to email, and I'll send to you.

Explosion box opened.   I added photos to all flaps with date and place notations.


Sunday, May 6, 2012

Time Out Stool - Owl


Time Out Stool / Baby Gift.   Owl and tree branch are from Create a Critter Cricut cartridge (owl cut at 3.8" and branch at 4").   Background cloud paper from Best Friends Imagine cartridge (circle cut at 9.5").   Kite is also from Best Friends Imagine cartridge (cut at 2").


Blue twine added between kite and tree branch.  Red twine used to outline kite and yellow twine added to center of kite.

 "Silas" font is from Songbird Cricut cartridge - letters were welded together via Cricut Craft room.   Glossy Accents was added to top of kite.   Stickles added to "Silas", leaves and Owl.   Ribbon attached around side of stool using Tacky Glue.

Paper colors are from Best Friends Imagine cartridge.  Images were all attached using Mod Podge.

Friday, May 4, 2012

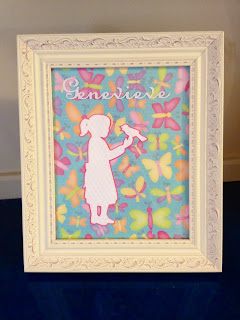
Picture This - Baby Gift

How adorable - how unique - how easy and inexpensive can this be!


Honestly, it didn't take me 15 minutes to pull this baby shower gift together.   Genevieve's mother-to-be will love it.

I purchased the photo frame at Hobby Lobby using a 40% off coupon.   I believe I ended up paying less than $10 for it.   Also at Hobby Lobby I picked up a pretty sheet of paper to use for the background.

Back at home, I cut out the Girl and Bird image using white cardstock.   The image and pink shadow were both cut using A Child's Year Cricut cartridge (6.25").   I ran the white cut thru my Cuttlebug using the Swiss Dots folder.   Image was then glued to front of the background paper (that had been cut to 8" x 10").  

Inset into photo frame.

Next I went to the Cricut Craftroom (free application) and created a welded font text of "Genevieve" that I cut out in white vinyl.   Text was sized to be 6" long and created using the Songbird Cricut cartridge.   A simple application of the vinyl to the front of the glass using Transfer Tape and I can call it done!

** Update ** 

I decided that I wanted make a more 3D effect to this project.

Using some leftover background paper, I cut out one of the yellow butterflies and glued some light yellow twine outlining the wings.  

I also apply some Tacky Glue to rest of wings and sprinkled on glitter.


I attached to butterfly to outside of glass using Glossy Accents.   Also, applied Glossy Accents to pink center of butterfly.


I like the 3D look.