Pages

Monday, June 30, 2014

Bicycle Birthday Card

Hello, Friends!  Marilyn here with a birthday card using a family photo for a background mat.  The photo was taken by my son on his vacation in Colorado a couple weeks ago.

Designer Paper:  digital paper
Photo:  taken by my son
Bicycle:  from Silhouette Store # 43371
Banner:  from Silhouette Store
Sentiment: computer generated

A2 sized card = 5.5" x 4.25"

Photo mat sized at 4" x 3".  Love the white cross that appears in the clouds.  Banner is sized at .28" x 2.1".  Bicycle is sized at 1.4" x 2".  Bicycle was cut three times and glued together to create a chip board effect.


Thank you for visiting today! ~ Marilyn

Wednesday, June 25, 2014

I Have Found The One Whom My Soul Loves

Hello, Friends!   Marilyn here.  Today (June 22), my husband and I are celebrating our 25th wedding anniversary.  Hard to believe it's been 25 years - it went by in a blink of the eye.  I'm a very lucky woman to have found the one whom my soul loves.

My project today is a pillow cover that uses the Bible verse from Song of Solomon 3:4.


I purchased a pillow cover from Walmart.  Can't remember what I paid for it.  It's a hounds-tooth pattern in polyester.

Using my Silhouette software, I simply typed the text out and sized it at 10" x 8.25".  I sent the design to my ink transfer printer (Ricoh SG7100DN).   The PowerDriver software that manages my printer flips the image for me and prints it out on Transfer Paper.


I pre-heated my heat press for 375 degrees.  The ink transfer paper is positioned in the center and covered with a Teflon sheet.  I pressed at 375 degrees for 20 seconds.  The ink transfer printer I use is meant for cotton fabrics only.  When I pressed it to my polyester pillow cover, it did transfer fine but also made a dark square around my image.  Personally, I'm OK with this.  After all, I have found the one whom my soul loves... what more could I ask for?

Saturday, June 21, 2014

Patriotic Tie-Dye Shirt

Hello, Friends!  Marilyn here with a fun and messy project... tie dye shirts.

Patriotic Tie-Dye Shirt

What is Needed:

  • White T-Shirt
  • Tie-Dye Kit (found at Walmart)
  • Sink and Water
  • Washing Machine

I purchased this red and blue tie-dye kit at Walmart.  It came with the mixing bottles (dye was already in the bottle), rubber bands and plastic gloves.  The kit also comes with instructions and examples on different types of shirts to make.  This is a mini kit and there is enough dye to make 3 projects.

Tie-Dye Kit purchased at Walmart

Step 1:  Determine what type of design you want.  I'm hoping for blue on top and red on bottom that will be patriotic looking when complete.  Scrunch your t-shirt and add rubber bands.   When completed, the parts with rubber bands will be white.  The exposed portion will receive the dye.

Scrunching and adding rubber bands
Step 2:  Fill the bottles with water up to the fill line and shake.  Put on gloves.  Get your shirt wet and hand-wring dry.

Adding blue dye to top portion of wet shirt
Step 3:  Apply dye to shirt.  I'm added blue to top and red to bottom.  I noticed that the colors contaminate each other.  They can't seem to help dripping and puddling up in the same sink.   BTW - excuse the dishes pilled in my sink!

Adding red dye to bottom portion of wet shirt
Step 4:  Put your dyed shirt into a plastic bag.  I'm using the sack the came home with me from Walmart.  The instructions say to let your shirt sit for 6 - 8 hours.  I let mine sit 12 hours since I was going for a red portion (and I'm thinking it could end up pink if I rinse too soon.)

Dyed shirt placed in plastic bag and left to sit for 6-8 hours
Step 5:  Rinse, Rinse, Wash, Wash, Dry.   Rinse in cold water in the washer with rubber bands still on. Remove rubber bands and rinse again.  Wash twice in hot water (and detergent).  Dry in dryer.

And here is the result.

Tie-Dye Shirt after all the rinsing and washing and drying.
I decided to add some stars to my shirt.  I purchased a star from the Silhouette store and sized at .80".  I made the image into a cut and print and printed out on Square 1 Iron-On.

Star was purchased from Silhouette store and sized to .80 inches.
Next I placed the stars randomly on the top portion of my shirt and heat pressed at 325 degrees for 4 seconds.

Stars on top portion of the shirt
That's it!  Thank you for visiting my blog today! ~ Marilyn

Sunday, June 15, 2014

Hand Decorated Mother / Daughter Shoes

Here's a fun gift idea for a mother & daughter.  I have to admit, it wasn't my idea.  My oldest son and his wife are going to visit friends in Colorado next week.  They thought of this and I became involved.

Here's what we used to create these shoes:

  • Shoes purchased at Walmart
  • Sharpies
  • Fabric Glue
  • Stickles
  • Bling
  • Square 1 Printable
  • Silhouette Cameo 


Hand decorated shoes for Mom

Picture of shoes for Mom.  Zig-zag strips were cut using Square 1 and laid across the shoes making a template.  The template made the outline for the sharpie-colored decorations.  A little bling was added and attached using fabric glue.

Side view of Mom's Shoes

I {heart} Viv was printed and cut using the Silhouette.  Square 1 is a great product to use for this project.  You can move your design around until you're satisfied with final placement, then permanently attached using fabric glue.

Top view of Daughter's Shoes

Picture of daughter's shoes.  Once again Square 1 is used as a template for the zip-zag design.  Little hearts were hand drawn on back with a sharpie.   Stickles were added to zip-zag design.

Side view of Daughter's Shoes

The I {heart} Mom was printed onto the Square 1 product again.  It has been permanently attached using fabric glue.

Thank you for visiting my blog today! ~ Marilyn


Tuesday, June 10, 2014

Our Lady of Guadalupe - Baby Baptism Gift

Hello, Friends!  Marilyn here with a tutorial on heat transfers.  In this example, I'm using a baby onesie and an image of Our Lady of Guadalupe.


Some may know that my husband has a home-based Christian t-shirt business : www.gloryfactory.com (shameless plug)  


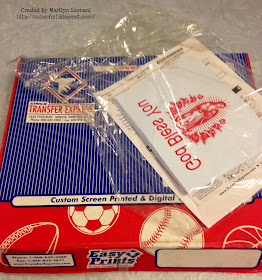
His t-shirts are created using heat transfers that many times are created for him via Transfer Express.   Last week he had a special order for a remodeling company that wanted an image of Our Lady of Guadalupe and the words "God Bless You" on the shirt pocket.  When the heat transfers arrived, he realized that the images were too large for a shirt pocket and reordered.   Soooo, long story to get to this point...  The images were too large for a shirt pocket, but would fit the front of a baby onesie.


Actually, the "God Bless You" part was too long for a onesie as well.  I had to cut it into sections to fit the front of the onesie.


Heat presses always arrive with heating instructions.  This image needed to be pressed at 365 degress for 4 seconds.  After heat pressing, you just pull the transfer off leaving the image on your clothing.


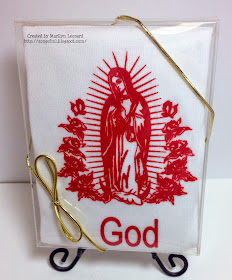
Here's the completed onesie.  I'll use this as a baptism gift.  It will work for either a boy or girl.

Another note:  I have a bunch of these clear boxes for A2 sized cards.  I just re-purposed it as a gift box for my onesie.

What do you have that can be re-purposed?

~ Marilyn

Saturday, June 7, 2014

#Hashtag Dad

Hello, All!  Marilyn here with a Father's Day gift idea.  Is your father the Grill Master of the household?

Three pocket adult sized apron.


Items Needed

  • Apron Blank - I purchased mine at Hobby Lobby today (on sale) for $3.49
  • Square 1 Iron-on - one sheet is approximately $1.90
  • Ink Jet Printer
  • Silhouette Cutter
  • Heat Press or Home Iron


Apron purchased on sale at Hobby Lobby

My first step was to pre-wash and dry the apron.

Screen shot of Silhouette design with registration marks
While that is taking place, I found this image of Snoopy with his chef's hat and cooking utensils on the internet.   I was able to easily trace it within the Silhouette software.   I added a small white offset around the image since this was going on a red apron.  The image Cut Style was set to "cut edge."  I turned on the registration marks and printed onto the Square1 Iron-On that had been loaded in my home printer.

No layering needed.  Entire image is just one layer.
The image was cut out with the Silhouette and leaves you with a one layer iron-on patch.

At the heat press.
Lay out image where you want to attach to apron.

I pre-heated my heat press to 325 degrees, covered my blank apron with a Teflon sheet and pressed for 4 seconds.  I then laid the Snoopy image on the apron, covered with a Teflon sheet and pressed again for 4 seconds.

Finished apron.

Ta-Dah!  All done and ready for Dad!

Thank you for visiting my blog today! ~ Marilyn

Sunday, June 1, 2014

SBC June Card Kit

Today kicks off another card kit by the SBC team.  June's kit is super cute - I really love the little ant stamps!  Perfect for Summer.  Here are the cards I created from my kit:

Card 1 - front view
Card 1 - inside view
Card 2 - front view
Card 2 - inside view
Card 3 - front view
Card 3 - inside view
Card 4 - front view
Card 4 - inside view
Thank you for visiting my blog today! ~ Marilyn

To see the rest of the design team project details, click on the links below.  Leave a comment on each blog to be eligible for a gift voucher from Scrapping of Less.  
Brenda - Disney Girl
Marilyn - Marilyn's Crafts
SBC- www.scrapbookblessings.blogspot.com