Sunday, July 7, 2013

MCCR - Wedding Ideas


My son is getting married this coming October.  To save some money, we have decided to make some of the wedding décor items ourselves (the bride-to-be is crafty, too).  It's so fun to make it yourself!

Here are some of the items we are currently working on:

Wedding Invitations.  More pictures and directions here.

Wedding Invitations
Initial monogram from Cricut Mini Monograms


Wedding Ribbon Wands for send off.  More pictures and directions here.

Wedding Ribbon Wands


Candle Center Pieces made using Mod Podge and Cricut cartridges Sweethearts and Tie the Knot.  More pictures and directions here.

Candle Center Pieces
Cricut Tie the Knot and Sweethearts cartridges.

Glitter Pinecones for Table Accents.  More pictures and directions here.

Glitter Pinecones


Wedding Wall Décor Canvas.  More pictures and directions here.


8" x 10" canvas
Cricut Storybook cartridge

Wedding Ideas - Wedding Ribbon Wands

Back in my day the newly married couple was blessed with rice as they departed the wedding / reception.  From there it went to bird seed, bubbles and confetti.  Today's tradition has evolved to the ribbon wand.  Personally, I like it. 

Wedding Ribbon Wands
These little ribbon wands are fun to use and simple to create.  I purchased a 36" long wood dowel and cut into three 12" sections.  After sanding the ends, I painted the dowels in an orange color to match the bride's color scheme.

Next I cut two different ribbons at 16" each and attached them to the top of the dowel with hot glue. 

 
I purchased a package of jingle bells and liberty bells.  (I'm assuming they were called liberty bells due to the fact that they were being sold around the 4th of July.)  I ran some twine through the top of each and tied them to the dowel.  They are secured with a drop of hot glue.

Wedding Ideas - Candle Center Pieces

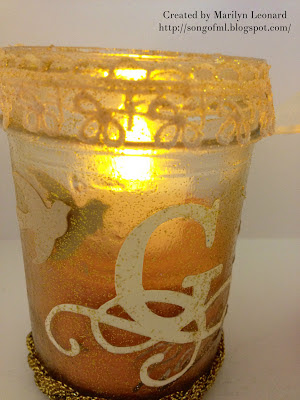
We used half-pint (8 ounce) canning jars to make our wedding candle center pieces.  The jars were first painted with a mixture of Mod Podge and gold glitter and allowed to dry. 

Wedding Candle Center Pieces
On this candle center piece, we glued on two different ribbons using the Mod Podge and glitter mixture.  The gold ribbon is very thick and heavy and I need to secure it further with hot glue.

The flourish "G" was cut at 2" from Cricut Tie the Knot cartridge.  It too was attached with the Mod Podge glitter.  Once dried, a second coat of Mod Podge was added.

The doves are from a Martha Stewart punch.  One is glued on the inside of the glass and the other on the outside.

After everything dried, I added some orange sand (found in the children's craft section at Michaels).  A flameless candle has been added to finish this candle piece.

Cricut Tie the Knot cartridge

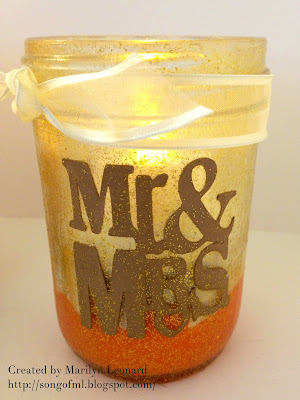
The bottom of the second candle was created by pouring in a small amount of orange paint and allowing to dry.  The glitter Mod Podge mixture was then painted on the inside of the glass (as well as the outside). 

The "Mr. & Mrs." image was cut at 2" from the Cricut Sweethearts cartridge; found on page 63 of the folder.  The image was attached with the glitter Mod Podge mixture to the outside of the glass.  A second coat was added once the first coat dried.

The dove is from a Martha Stewart punch and has been glued to the inside of the glass with the glitter Mod Podge mixture. 

The bottom of the jar is one layer orange sand, one layer white sand.  A flameless candle is sitting on top of the sand.

The ribbon around the top is merely tied on to the jar.

Cricut Sweethearts cartridge

Wedding Ideas - Glitter Pinecones

Since the upcoming wedding is scheduled for October, the bride-to-be wanted pinecones to accent her tables.  She is a bling kind of girl, so we wanted to add glitter to the pinecones.  But, we didn't want the glitter coming off on our guests.

FYI - the pinecones we used were all just picked off the ground, none were purchased.

We were able to accomplish this goal by mixing our glitter with Mod Podge "Luster."  Once we had our Mod Podge mixture, we just painted it on to our pinecones. 

Glitter Pinecones

The pinecones came out so pretty and shimmery - and no glitter residue.
We used three different colors of glitter:  gold, glitz and champagne. 

Wedding Ideas - Wall Decor

I've used an 8" x 10" canvas purchased at Michaels to create the following wall décor.


Wedding Wall Décor
8" x 10" canvas
Wall Décor Recipe:
  • Paint canvas using Apple Barrel Acrylic Paint "Pumpkin Orange."
  • Mix gold glitter (I used Martha Stewart fine glitter) with Mod Podge "Luster" and paint over dried canvas.
  • Cut "Happily Ever After" at 5.75" from Cricut Storybook cartridge; found on page 69 of the folder.  Attached with Mod Podge mixture.  Once dry add an addition coat of the Mod Podge mixture.
  • Add brown twine around the "Ever" text with white glue.  I used Scotch Quick-Dry Adhesive. 

  • Punch four butterflies using Martha Stewart punch - three in brown and one in beige.  Coat each with the Mod Podge mixture and let dry.  Attach to canvas using the same Mod Podge mixture.  Use Liquid Pearls to create head of butterflies.  Bend tips of wings up.

  • The beige butterfly also had some of the orange paint dabbed on to it.
  • Punch several small flowers using a Martha Stewart punch.  Attached with Mod Podge mixture.  Use Liquid Pearls to create center of flowers.

  • Use a Martha Stewart border punch to create the lace borders.  Attached diagonally using the Mod Podge mixture.   After drying, add a second coat of Mod Podge mixture over the borders.
  • Add color coordinating twine and attach using white glue.
  • Punch flower accent with Martha Stewart punch.  Use Liquid Pearls for flower center.  Attach with white glue.

Wedding Ideas - Invitations

I have to admit that I was a little concerned when the bride-to-be asked me to make her wedding invitations.   Would she like my design?   How labor-intensive would this be?    The bride knew what color she wanted and she had her heart set on a square card.    Together we scanned the internet and found what she was looking for. 

Wedding Invitations - finished size is almost 6" square

The invitation consists of a 5.8" square, four flaps, a 5.75" decorative insert.  I cut the square pieces with my paper trimmer.  The flaps were cut with the help of a SVG file.

All the parts that make up an inviation

After the flaps were cut, they were embossed with the Cuttlebug "Divine Swirls" folder and taped to the four sides of the 5.8" square.  The decorative 5.75" square was then taped over the attached parts to make a pretty and clean looking inside.

I have not made the actual "invite" part yet.  When that's done it will be taped on top of the decorative insert.

Initial made using Cricut Mini Monograms cartridge

The flaps fold in on themselves to close the invitation.  I cut a .25" x 12" strip from the decorative design paper to create the belly band.  Just wrap around the invitation and scotch tape together.  The monogram initial covers up the scotch tape on the belly band.

The monogram initial was cut at 2" from the Cricut Mini Monograms cartridge feature on page 91 of the folder.  The beige background was cut at 2" from the Mini Monograms cartridge using the feature on page 91 of the folder.