Friday, April 25, 2014

Office Wall Decor

Hello, Friends!  Earlier this month I started a new job.  It's a hard and exciting adventure.  I had been with my previous employer since 1999.  Yikes!  Anyway, my new office came equipped with the usual desk, PC, bookcase and white board.  The walls are blank and need something.

I found a couple of cartoon images via the Internet and traced them using my Silhouette software.  The images are all printed on Square1 Printable.  Makes it so easy to peel from backing and apply right to the office wall and white board.  And when using Square1, they can be re-positioned whenever I'm ready to move them.

Roadrunner is on a corner of the white board
Snoopy is dancing over my name plate outside the door
  Roadrunner and Snoopy were both located via an Internet search.  They are not layered, but are all one single colored layer.   Images are printed and cut using Square1 Printable and can be easily moved and reused in another location.

Layout of Roadrunner within Silhouette software

  • Roadrunner image found using Internet search.
  • Image saved as a .jpg on my PC
  • Image traced within Silhouette software giving it a cut line around the image.
  • Image sized at 9" height and 5.6" in width.
  • "Beep" text created within Silhouette.  Sized at 1.5" in height and 3" in width (each).
  • Add Registration Marks.  Make sure images fall within registration outline.
  • Set paper size to 8.5" x 11" and print on Square1 via Silhouette software
  • Cut image using Silhouette.
  • Peel from backing and apply directly to white board.
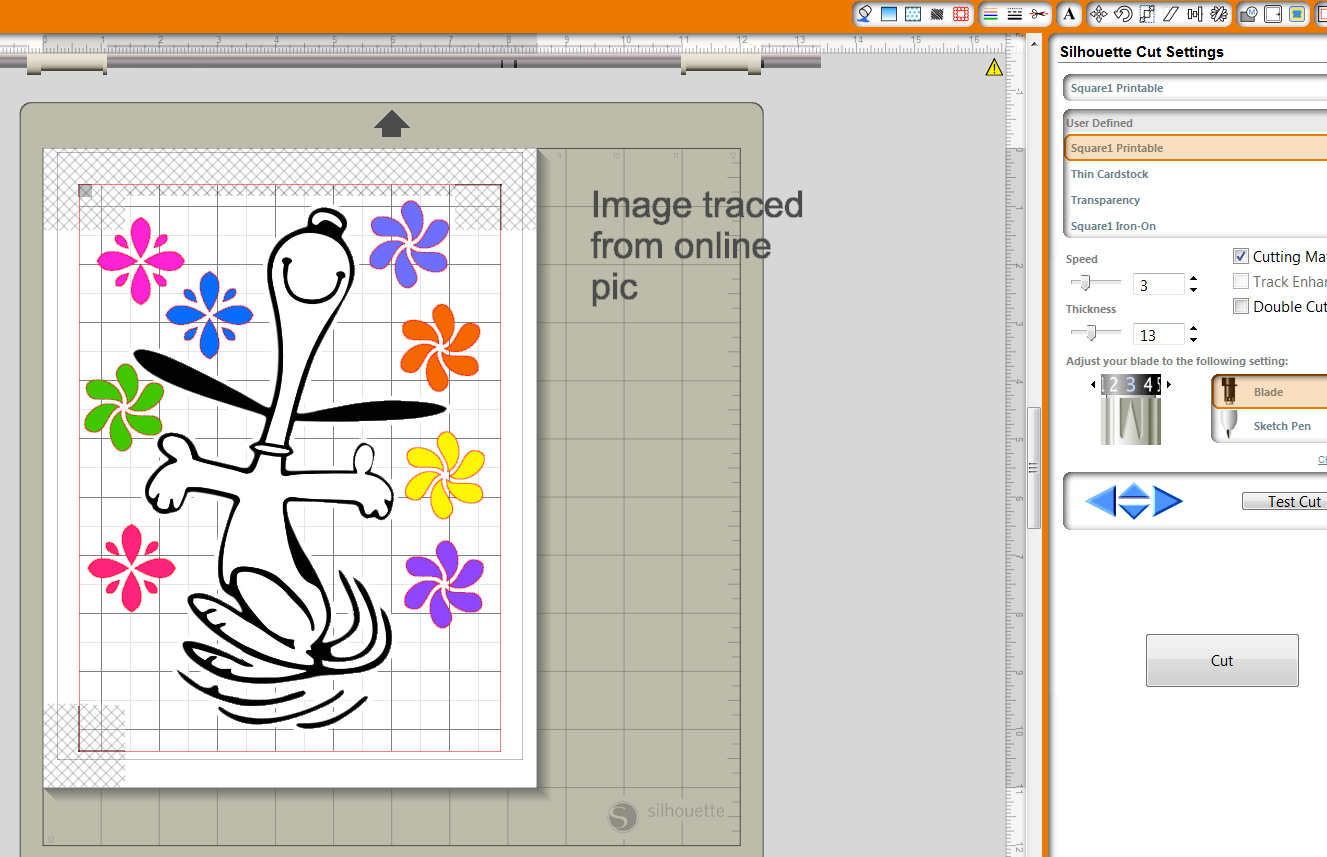
Layout of Snoopy within Silhouette software

  • Snoopy image found using Internet search.
  • Image saved as a .jpg on my PC
  • Image traced within Silhouette software giving it a cut line around the image.
  • Image sized at 9" height and 5.5" in width.
  • Flower images purchased via Silhouette store.  Sized at 1.5" in height (each).
  • Add Registration Marks.  Make sure images fall within registration outline.
  • Set paper size to 8.5" x 11" and print on Square1 via Silhouette software
  • Cut image using Silhouette.
  • Peel from backing and apply directly to office wall.
Want a free copy of my *.studio files used for this project?  Visit me on Facebook (please "like" my page while there).  Leave me a FB message and I'll gift you the files!

Thank you for visiting today!  ~ Marilyn

Friday, April 18, 2014

DIY Body Butter

Hello, Friends!  I absolutely love body butter.   I love the creamy and fluffy-ness of it.   So, last January when I was invited to attend a make-and-take on lavender body butter, I happily attended.   The recipe below is from a Young Living Essential Oil group called Only One Drop.  Their web site is onlyonedrop.com and they are also on Facebook.

Well, January has come and gone and now I'm needing more body butter.  So, here I go.  I'm using their recipe and making my own.   I switching out the Lavender Essential Oil for Peppermint Essential Oil.  Why?  My order for the lavender has not arrived yet.   So, I'm using what I have.  LOL!  Hope I love it as much as the lavender version.

Original Recipe:  DIY Lavender Body Butter from Only One Drop

I found all the ingredients (except essential oil) at my local grocery store.
Prices for each are listed below item.
Ingredients:

  • 1/2 cup Shea Butter
  • 1/2 cup Coca Butter or Mango Butter
  • 1/2 cup Coconut Butter
  • 1/2 cup light oil like almond, olive or jajoba
  • 10 - 15 drop Young Living Lavender Essential Oils
Combine all ingredients (except essential oil) and melt over medium heat

Directions:
  1. In a double boiler or glass bowl, combine all ingredients except essential oils.
  2. Bring to medium heat and stir constantly until all ingredients are melted
    Remove from heat and let cool slightly
  3. Remove from heat and let cool slightly.
    Move to fridge and cool for 1 hour
  4. Move to fridge and let cool another 1 hour or until starting to harden but still somewhat soft.
    Add Essential Oils
  5. Add essential oils.
    Whip for 10 minutes
  6. Use a hand mixer to whip for 10 minutes until fluffy.
    Back in fridge for 15 minutes
  7. Return to fridge for 10 - 15 minutes to set.
    12 ounce glass jars
  8. Store in a glass jar with a lid and use as you would regular lotion or body butter.

Making a Jar Label:
2 inch circles

  • On Silhouette, make 2 inch circles.  
  • Color fill
  • Insert text 
  • Print and cut outer edge only using Square1 Printable.
Apply Square1 labels to jar lid

  • Peal and Stick to top of jar lid
    Makes three 12 ounce jars of body butter
Wouldn't these also make great gifts?

Thank you for visiting my blog today! ~ Marilyn

Sunday, April 6, 2014

Under The Sea - Glass Block

Hello, Friends.  Today I went to Michaels and picked up a glass block at 50% off.  I'm convinced now is the time to purchase items at bargain prices - don't wait until Christmas season when you'll gladly pay full price if you can locate a glass block in the store.

I searched the internet and found some fun under water images to use on my glass block.  These images were traced and cut using my Silhouette.  Other images found on the glass block were purchased.

The background colors were all created using Tim Holtz Alcohol Inks.  Images were all printed and cut using Square1 Printable.  Love Square1 - no layering.  And I can take images off, move them around, whatever.

I could add lights to this glass block, but I think I'll use it to keep loose change.


Thank for visiting today! ~ Marilyn

Tuesday, April 1, 2014

SBC Card Kit Release

Hello, Friends. The design team at SBC are starting a new and fun monthly card kit release. This month features great looking card stock, embellishments, ink, Wink of Stella, baker's twine, labels and other fun items.

Video Announcement from SBC

Here are a couple of cards I made using the product I received in my kit.


Box Card Design #56152
From Silhouette Store
This fun box card folds flat and fits into an A2 sized envelope.  The design #56152 was created by Lori Whitlock and is available through the Silhouette store.  I deviated a bit from the original by adding an extra owl in front.


Side view.  All edges were inked.


Side view #2.  


A2 sized card

Second card created from Kit.  I cut the labels in half and made flags from them on my card.

Side view of card.

Inside view of card.

Thank you for joining me today!  ~ Marilyn