Showing posts with label Sweethearts. Show all posts

Friday, September 27, 2013

Bridal Shower Layout

Hi friends!  Marilyn here and I have a confession to make:  this is my FIRST layout - ever

First, I have my tip of the day for you.... Scrapbooks are a blessing.  Seriously, the memories we document today will be treasured beyond our lifetimes.

Instead of having these photos tossed and forgotten in a shoe box, I now have this great and lasting keepsake.

Bridal Shower Layout


Here is what you need:
  • 12" scrapbook design paper.  Mine came from K&Company "SW Spring Blossom."
  • Cricut cartridges:  Pretty Pennants, Storybook, Sweethearts
  • Cardstock:  black, orange, yellow
  • Twine
  • Foam Tape
  • Bling (gems and such)
  • Adhesive
  • White gel pen
  • Family Photos


Layout Recipe:

Page Banner
  • Cut a piece of twine the length of your scrapbook page.  Pull through a dollop of glue and lay onto your scrapbook page.  Make two bows and glue to each end.
  • Cut banners from Cricut Pretty Pennants cartridge at 1 1/2" [BnrSclp1].  Attach to twine with foam tape.
  • Cut letters from Cricut Storybook cartridge at 1".  The apostrophe on the "S" is actually the center from the letter "A". 
  • "Bridal Shower" = cut image and shadow at 2 1/2" from Cricut Sweethearts cartridge; [Shower] found on page 51 of the folder.  Somewhere between the cutting and attaching, I lost the dot for the "I", so I used a gem in place.
  • Photos:  Each photo is layered with black cardstock; cut to size.
  • Name Banners:  cut at 1 1/2" from Cricut Pretty Pennants cartridge at 1 1/2" [BnrSclp1].  Add a white gem at the top.  Names are handwritten using a white gel pen.


  • Journal Panel:  cut image and shadow at 2 1/4" from Cricut Storybook cartridge; [Marque2-s] found on page 66 of the folder.


I hope your enjoyed todays project, and as always, comments are appreciated.

Thank you for stopping by and Have a blessed day!

~ MARILYN 

Sunday, September 8, 2013

Wedding Towel Cake

Bridal Shower is tomorrow for my future daughter-in-law.  I purchased towels on her bridal registry and decided it would be more interesting and fun to give them in the form of a wedding cake.

Ingredients:
  • Towels:  2 bath, 1 hand, 1 finger tip purchased at Bed, Bath & Beyond
  • Cricut Cartridge:  Accent Essentials, Plantin SchoolBook, Storybook, Sweethearts
  • Punch:  Heart punch from Martha Stewart
  • Other:  Glimmer Mist "Iridescent Gold", Glimmer Mist "Lemon Zest", Glimmer Mist "Peach Delight", white tulle, gems, Stickles, corsage pins from Michaels, Popsicle Sticks from Michaels, green paint, hot glue.


Towel Cake
Towel Cake Recipe:
  • Bottom Layer:  Roll finger towel and 1 bath towel together.  Wrap the hand towel around and secure in back with corsage pins.
  • Top Layer:  Roll 1 bath towel.  Secure in back with corsage pins.
  • * Bath Towels are folder length-wise into fourths.
  • Tie white tulle around both layers.
  • Bells on bottom layer:  cut image and shadow at 2" from Cricut Sweethearts cartridge; [Bells] found on page 56 of the folder.  Gem glued to center of bow image.  Tie onto tulle with white twine.
  • Flowers = cut 20 each (all from white card stock):  one set at 2", one set at 1 3/4", one set at 1 1/2" - from Cricut Accent Essentials cartridge; [Accent24-s] found on page 54 of the folder.  Spray half of 2" and 1 3/4" flower cuts with Glimmer Mist "Iridescent Gold."  Spray other half or 2" and 1 3/4" flower cuts with Glimmer Mist "Lemon Zest."  Set aside to dry.  Spray all of the 1 1/2" flower cuts with Glimmer Mist "Peach Delight."  Set aside to dry.  Once dry, the flowers will be colored as white shimmer, yellow shimmer and peach shimmer.
  • Flower Stems = paint round popsicle sticks with green paint and set aside to dry.
  • Flower Leaves = cut at 10 (from green card stock):  one set at 1 3/4", one set at 1 1/2" = from Cricut Accent Essentials cartridge; [Accent41-s] found on page 72 of the folder.
  • Flower Assembly = bend each flower petal in the center.  Glue together one each: 2" in white, 1 3/4" in yellow, 1 1/2" in peach. Other flowers will be assembled as:  2" in yells, 1 3/4" in white, 1 1/2" in peach.  Glue gem to center of each flower.  Glue one leaf to back.   Attach to green popsicle stick using hot glue.  I chose to make some flowers without the 2" flower layer.

  • Poke the flower sticks around the bottom cake layer. 
  • Top flowers are attached with foam tape.
  • Car at top = cut image and two shadows at 3 3/4" from Cricut Sweethearts cartridge; [CarCuple] found on page 65 of the folder.  After assembled, hot glue a green popsicle stick to the back of the car's shadow.  Attach the second shadow to the back using foam tape around the popsicle stick.
  • Date on back of car = cut at 1/2" from Cricut Plantin SchoolBook.

Cake Board
Cake Board:
  • Flowers = cut seven flowers from white card stock at 1 1/2".  Spray with Glimmer Mist "Peach Delight."  Once dried, glue around edge of cake board.  Add a gem to the center.
  • Names "Jessica & Dave" = cut letters and shadows at 2" from Cricut Storybook cartridge.  Glue around edge of cake board.  Punch two small hearts and glue on either side of the "&" symbol.  Add stickles to "&" symbol.
  • Heart & Couple Silhouette = cut image and shadow at 5" from Cricut Sweethearts cartridge; [HeartCpl-s] found on page 40 of the folder.  
  • Text "I Do . . . " cut at 1" from Cricut Sweethearts cartridge; [Ido-s] found on page 60 of the folder.

Sunday, July 7, 2013

MCCR - Wedding Ideas


My son is getting married this coming October.  To save some money, we have decided to make some of the wedding décor items ourselves (the bride-to-be is crafty, too).  It's so fun to make it yourself!

Here are some of the items we are currently working on:

Wedding Invitations.  More pictures and directions here.

Wedding Invitations
Initial monogram from Cricut Mini Monograms


Wedding Ribbon Wands for send off.  More pictures and directions here.

Wedding Ribbon Wands


Candle Center Pieces made using Mod Podge and Cricut cartridges Sweethearts and Tie the Knot.  More pictures and directions here.

Candle Center Pieces
Cricut Tie the Knot and Sweethearts cartridges.

Glitter Pinecones for Table Accents.  More pictures and directions here.

Glitter Pinecones


Wedding Wall Décor Canvas.  More pictures and directions here.


8" x 10" canvas
Cricut Storybook cartridge

Wedding Ideas - Candle Center Pieces

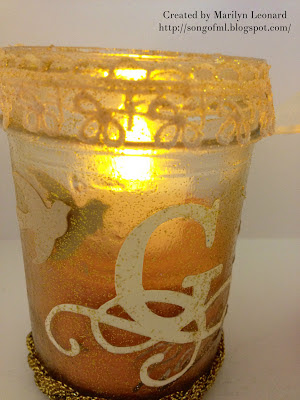
We used half-pint (8 ounce) canning jars to make our wedding candle center pieces.  The jars were first painted with a mixture of Mod Podge and gold glitter and allowed to dry. 

Wedding Candle Center Pieces
On this candle center piece, we glued on two different ribbons using the Mod Podge and glitter mixture.  The gold ribbon is very thick and heavy and I need to secure it further with hot glue.

The flourish "G" was cut at 2" from Cricut Tie the Knot cartridge.  It too was attached with the Mod Podge glitter.  Once dried, a second coat of Mod Podge was added.

The doves are from a Martha Stewart punch.  One is glued on the inside of the glass and the other on the outside.

After everything dried, I added some orange sand (found in the children's craft section at Michaels).  A flameless candle has been added to finish this candle piece.

Cricut Tie the Knot cartridge

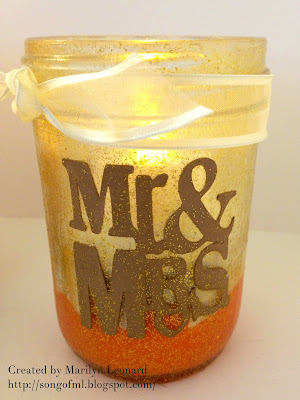
The bottom of the second candle was created by pouring in a small amount of orange paint and allowing to dry.  The glitter Mod Podge mixture was then painted on the inside of the glass (as well as the outside). 

The "Mr. & Mrs." image was cut at 2" from the Cricut Sweethearts cartridge; found on page 63 of the folder.  The image was attached with the glitter Mod Podge mixture to the outside of the glass.  A second coat was added once the first coat dried.

The dove is from a Martha Stewart punch and has been glued to the inside of the glass with the glitter Mod Podge mixture. 

The bottom of the jar is one layer orange sand, one layer white sand.  A flameless candle is sitting on top of the sand.

The ribbon around the top is merely tied on to the jar.

Cricut Sweethearts cartridge

Friday, May 24, 2013

MCCR - Wow Wedding Weekend Blog Hop


DIY Wedding Gifts and Cards.   There's nothing better than giving something that you made yourself - and it doesn't hurt if you saved a bundle in the process!

Glass Etching - Storybook cartridge
 
To make a glass etched flute:
  • Using vinyl, cut an initial from Storybook cartridge to a size to fit your flute.  Mine was approximately 1.5". 
  • Use the negative of your cut and place on the flute.  (Remove the initial and use the stencil portion of the vinyl.)
  • Use painter's tape to cover outlining edges of the vinyl.
  • Apply a good amount of Armour Etching cream.  Be careful not to get any on the rest of the glass.   Wait about 30 minutes (even though instructions say less time.)
  • Rinse under running water in your sink (yep, it's safe.)
  • Remove vinyl and painter's tape and admire your etched glass.
 
* Note - I found that the less expensive glasses etch the best.  I purchased my flute in a package of 4 from Walmart.     The Armour Etching cream is expensive but lasts and lasts and lasts.   Use a coupon to purchase initially.
 
Sweethearts cartridge
 
  • Cards created using Sweethearts cartridge. Card on right "His and Her Towels" is one of a set of 8 thank-you cards. The lace at bottom of card is actually paper that was punched from a Martha Stewart punch.
Accent Essentials cartridge
  • The part that took the longest to create were these little pink rose buds on the package. Each rose bud was created by combining six flowers (cut at one inch) from the Accent Essentials cartridge. The leaves are from a punch.
 
Your Next Stop is L.E. Paper Studio:  http://lepaperstudio.blogspot.com

Here's the Line Up:
 
1. Start http://MyCricutCraftRoom.blogspot.com
2. Marilyn's Cricut Crafts - http://songofml.blogspot.com/
3. L.E. Paper Studio - http://lepaperstudio.blogspot.com
4. Sandy- http://scrapbookblessings.blogspot.com
5. Julie - http://www.thecricutchirp.com
6.Shelly ~ http://cardsbyshelly.blogspot.com
7. Faith Abigail - http://www.faithabigaildesigns.com
8. Erica Http://EricasProjects.blogspot.com
9. Craft Lovers http://CraftLoversComeHere.blogspot.com
10 Aisha www.londonskyedesigns.blogspot.com
11. End http://CraftingBlogEvents.blogspot.com

Sunday, July 1, 2012

Bless This Nest

Birds of a feather . . .


Bless This Nest :  8 x 10 canvas with images from Sweethearts Cricut Cartridge.  Leaves are from Enjoy the Seasons Imagine cartridge.   Birds in nest cut at 5 inches.  "Bless this Nest" cut at 4 inches.  Leaves cut at 2 inches.  Canvas accented with Perfect Pearls.

Images added using mod podge.   All colors from Enjoy the Seasons Imagine Cartridge.

The Perfect Pair

A random photo of my feet and my husband's feet becomes art.


This is a photo of my feet and my husband's feet.  I found the tile piece in my garage, left over from a kitchen remodel a couple years back.

 Font "The Perfect Pair" from Sweethearts Cricut Cartridge (4 inches).  Font "Mr. & Mrs." (1 1/2 inch) from Winter Woodland Cricut cartridge.

Items were mod podged onto the file.   Little dots are Holtz Perfect Pearls.   Flowers are from a punch.

Monday, April 9, 2012

Wedding Gifts ~ Glass Etching


Wedding gifts & card. Glass etching on glasses were from stencil made using Storybook Cricut cartridge.


Cards created using Sweethearts Cricut cartridge. Card on right "His and Her Towels" is one of a set of 8 thank-you cards. The lace at bottom of card is actually paper that was punched from a Martha Stewart punch.


The part that took the longest to create were these little pink rose buds on the package. Each rose bud was created by combining six flowers (cut at one inch) from the Accent Essentials Cricut cartridge. The leaves are from a punch.