Showing posts with label 01 DIY Gifts. Show all posts

Saturday, June 7, 2014

#Hashtag Dad

Hello, All!  Marilyn here with a Father's Day gift idea.  Is your father the Grill Master of the household?

Three pocket adult sized apron.


Items Needed

  • Apron Blank - I purchased mine at Hobby Lobby today (on sale) for $3.49
  • Square 1 Iron-on - one sheet is approximately $1.90
  • Ink Jet Printer
  • Silhouette Cutter
  • Heat Press or Home Iron


Apron purchased on sale at Hobby Lobby

My first step was to pre-wash and dry the apron.

Screen shot of Silhouette design with registration marks
While that is taking place, I found this image of Snoopy with his chef's hat and cooking utensils on the internet.   I was able to easily trace it within the Silhouette software.   I added a small white offset around the image since this was going on a red apron.  The image Cut Style was set to "cut edge."  I turned on the registration marks and printed onto the Square1 Iron-On that had been loaded in my home printer.

No layering needed.  Entire image is just one layer.
The image was cut out with the Silhouette and leaves you with a one layer iron-on patch.

At the heat press.
Lay out image where you want to attach to apron.

I pre-heated my heat press to 325 degrees, covered my blank apron with a Teflon sheet and pressed for 4 seconds.  I then laid the Snoopy image on the apron, covered with a Teflon sheet and pressed again for 4 seconds.

Finished apron.

Ta-Dah!  All done and ready for Dad!

Thank you for visiting my blog today! ~ Marilyn

Tuesday, April 16, 2013

Family Wall Decor

 
Having fun with my sister-in-law - she's crafty :-)
 
Papers for houses from
DCWV The Crafty Stack

This is my sister-in-law's family wall project.

And here's mine:

Papers for houses from
K&Company SW Spring Blossom

My sister-in-law was flipping through the March 2013 issue of Cricut Magazine when she came upon a cute Home Canvas project made by Kristen Swain (page 75 of magazine).  Anyway, we decided that we could do that too.  And we did!

Here's how to make your own.
  • Paint sides of a 8" x 10" canvas.
  • Lines on sides = drawn using a straight edge ruler.
  • Houses = cut at 1.25" from Cricut Handy Man Lite cartridge; on the folder.  Houses with text on pink version is mounted with foam tape.  Edges of houses on blue version inked with Tim Holtz Pealed Paint Distress Ink.  Edges of houses on pink version inked with Tim Holtz Tea Dye Distress Ink.
  • Text "FAMILY" = cut at .75" from Cricut Plantin SchoolBook cartridge.
  • Hearts = cut at .75" from Cricut Plantin SchoolBook cartridge; found on page 73 of folder.  Hearts on pink version mounted with foam tape.
  • Clouds = from EK Success punch.
  • Small hearts = from Martha Stewart punch.

Saturday, December 22, 2012

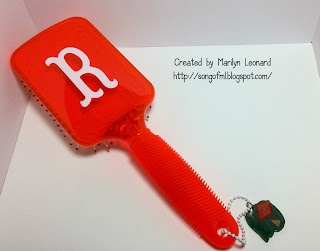
Monogram Hairbrushes With Shrinky Dinks Charms

 I purchased these four Conair hairbrushes at Walmart for $3.98 each.   I liked the fact that they had a nice flat back - perfect for adding a monogram.


Initial monograms in white vinyl.   Initials were cut at 2.5" using Cricut Storybook cartridge.


Adding Shrinky Dinks Charms!   Images printed and cut at 2.5" using Cricut Imagine Best Friends cartridge.   Above picture is before shrinking in the oven (325 degrees for 3 minutes.)  Place images on a cookie sheet with brown sack underneath.   Images need to be baked printed side down.

When printing / cutting on Cricut Imagine, make sure to print on the ruff side to prevent streaking.   Also, when complete the image will be reversed.  As seen above, images with text were backwards - I should have "flipped" the image before printing on the Imagine to correct the issue.

Additionally, I punched a 3/16" hole at the top of each charm before placing in the oven.


Shrinky Dinks after coming out of the oven.   Charms shrink down to 1/3 of original size.


Purple hairbrush with charm added.  The purple ball chain was purchased at Hobby Lobby for $1.47.  Original chain was much longer; I cut to desired size using regular scissors.

Jump ring was added thru charm to enable attachment to chain.

I also added Mod Podge Dimensional Magic to top of charm to give it the extra thickness and shine.   Make sure the jump ring is in the charm before adding the Mod Podge Dimensional Magic.  Allow the charm about 3 hours to dry before handling.


Pink monogram hairbrush with charm.


Orange monogram hairbrush with charm.


Blue monogram hairbrush with charm.

Saturday, July 21, 2012

Photo Frames

Litte frames, little paint, little vinyl, and some wisdom from Pooh.  

"Sometimes," said Pooh, "the smallest things take up the most room in your heart."


Photo frames are $1 from Michaels.  Close up photos of my three grandchildren.  Font text is white vinyl cut using Cricut Winter Woodland (1 inch in height).  Wood frames purchased at Michaels and spray painted.

Flower Pot


Flower pot made using a $1 can from Target.  All flowers come from Cricut Bloom Lite cartridge.  Bottom flowers cut at 2 inches, top flowers cut at 2.5 inches.   Flowers attached to popcycle sticks that have been stuck into styrofoam.

Paper colors are from Cricut Imagine Best Friends cartridge.


Grass is green grass sold for Easter baskets.  Butterflies are a Martha Stewart punch.  Flowers and butterflies accented using Liquid Pearls and stickles.

Leaves are from Cricut Accent Essentials cartridge (cut at 1.25")

Monday, July 16, 2012

Amazing Grace

Amazing Grace - how sweet the sound!

Home decor art work created using New Testament Cricut cartridge, Songbird Cricut cartridge and Industrial Glow Imagine.  Photo frame is 8x10 inches. 


Cross is found on page 27 of the New Testament handbook (cut at 7.5 inches).  Colors for cross come from Industrial Glow Imagine cartridge. There are 3 drops of "blood" on the cross created using a red Viva Decor pen.

I've added a Brown Scapular that falls to either side of the cross.  Image on left is our Blessed Mother giving the brown scapular to St. Simon Stock.   Image on right reads "Whosoever dies wearing this Scapular shall not suffer eternal fire.  Our Lady's Scapular Promise."   Read more about the Brown Scapular.

Background paper is from K&Company 'SW Spring Blossom Designer Paper Pad.'

The "Amazing Grace" text was cut from vinyl using the Songbird Cricut cartridge font (1.3 inches).   Vinyl is on outside of glass.

Also on outside of glass are 3 butterflies punched from Martha Stewart punch and using the reversed side of the same background paper.   Butterflies are highlighted using Liquid Pearls.

Sunday, July 1, 2012

Bless This Nest

Birds of a feather . . .


Bless This Nest :  8 x 10 canvas with images from Sweethearts Cricut Cartridge.  Leaves are from Enjoy the Seasons Imagine cartridge.   Birds in nest cut at 5 inches.  "Bless this Nest" cut at 4 inches.  Leaves cut at 2 inches.  Canvas accented with Perfect Pearls.

Images added using mod podge.   All colors from Enjoy the Seasons Imagine Cartridge.

The Perfect Pair

A random photo of my feet and my husband's feet becomes art.


This is a photo of my feet and my husband's feet.  I found the tile piece in my garage, left over from a kitchen remodel a couple years back.

 Font "The Perfect Pair" from Sweethearts Cricut Cartridge (4 inches).  Font "Mr. & Mrs." (1 1/2 inch) from Winter Woodland Cricut cartridge.

Items were mod podged onto the file.   Little dots are Holtz Perfect Pearls.   Flowers are from a punch.

Saturday, June 30, 2012

Wooden Spoons - Before and After

I am fairly certain that I have transformed these wooden spoons from useful and ugly to unuseful and decorative.

Before Picture:  These were my wooden spoons... they've seen better days.

Here's what the wooden spoons look like now.   It was my SIL Cindy that suggested adding faces to the spoons.

Hair and moustache from Cricut Paper Doll Dress-Up.   Hat from Everyday Paper Dolls.

Saturday, June 23, 2012

Lost Sock Wall Art


Image created using Cricut Meow Lite cartridge (cut at 6.5 inches).   Background and image colors from Best Friends Imagine (background cut at 7.5 inches using Imagine stock image 8:10).  
 
Canvas is 8 x 10 painted with Krylon Blue Ocean Breeze Gloss paint before images were attached using Mod Podge.  
 
Yellow puff paint used on image above socks.   Cloud created using Liquid Applique.  Twine added along clothes line.
 
Butterfly on cat is a Martha Stewart punch and was added to cover a paint smudge.
 
 
Clothes pins were painted and attached with hot glue gun.  Rinestones on clothes pins from Michaels.

Monday, June 18, 2012

Plant Stand Refurbished

Before and After Pictures


Before picture.   Just a little plain brown plant stand.   Its been passed around in my family for a number of years.


After picture.   I used a base paint followed by the blue glossy paint.   Bird cage and flower on top were cut from Bloom Lite Cricut cartridge and attached using mod podge.

Saturday, June 16, 2012

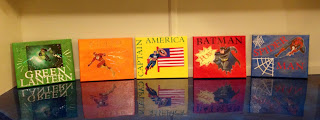
Batman Super Hero Wall Canvas

Batman Super Hero


Image downloaded from web and printed on regular ink jet printer.  Canvas painted and mod podged with Batman image and "BATMAN" letters.  POW background from Paper Doll Dress-Up Cricut cartridge.   All letters from Plantin Schoolbook Cricut cartridge.   Batman accented with stickles (belt).  POW background accented with Ranger Liquid Pearls and stickles.

Captain America Super Hero Wall Canvas

Captain America Super Hero


Image downloaded from web and printed on regular ink jet printer.  Canvas painted and mod podged with Captain America picture and "CAPTAIN AMERICA" letters.  Flag cut from My World Cricut cartridge.  Captain America image accented with stickles and Glossy Accents.  Letters cut from Plantin Schoolbook Cricut cartridge.

Spiderman Superhero Wall Canvas

Spiderman Super Hero


 Image scanned for picture I already had.   Spider webs from Mini Monsters Cricut cartridge (large web is 4", smaller image is 3").   Spiderman letters cut from Plantin Schoolbook Cricut cartridge.   Twine used to create web from hand of Spiderman to spider web.   Spider web also outlined in white twine.

Flash Superhero Wall Canvas

Flash Super Hero


Image downloaded from web and printed on regular ink jet printer.  Canvas painted and mod podged with Flash picture and "FLASH" letter.  Dots and lines drawn using Ranger Liquid Pearrls.  Letters accented with Stickles.

"FLASH" letters cut from Plantin Schoolbook Cricut cartridge.

Sunday, June 10, 2012

Green Lantern Wall Art

Green Lantern Super Hero - Wall Art


 Image downloaded from web and printed on regular ink jet printer.   Canvas painted and mod podged with Green Lantern picture and "Green Lantern" letters.  Dots and lines drawn using Ranger Liquid Pearls.   Letters accented with stickels.  Canvas is 8" x 10" in size.

Tuesday, June 5, 2012

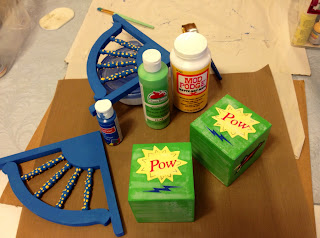
Super Hero Book Ends

Calling all Super Heros!

This was such a fun project to make.   It's rather simple, but time consuming.

First I purchased two 3 1/2 inch wood blocks from Michaels and one fan corner bracket at Lowes (package has both fans needed).


Paint and mod podge images.


Here are the images I used:


1.   Super Boy - cut from Paper Doll Dress-Up Cricut cartridge.   Letter "P" from Plantin Schoolbook.  Face on boy from Peachy Keen stamps.

2.  Super Dog - cut from Create a Critter Cricut cartridge (Terrior).   Mask is from the racoon on Create a Critter.   Cape is from 3 Birds on Parade.   I cut an additional Terrior in all blue and trimmed to get his boots.

3.  Pow - yellow part from Paper Doll Dress-Up (super boy cut accessory).  Blue lightening from Paper Doll Dress-Up (vampire cut accessory).  "POW" font from Plantin Schoolbook.


4.  Yellow lightening - Paper Doll Dress-Up (super boy cut accessory).

5.  Orange space ship - Paper Doll Dress-Up (super girl cut accessory).  Blue lightening from Paper Doll Dress-Up (vampire cut accessory).

6.  Black Car - Paper Doll Dress-Up (super boy cut accessory).  Silver wheels on car are a circle cut.   Orange and yellow lightening / flames are from Paper Doll Dress-Up (vampire cut accessory).  "P" on car from Plantin Schoolbook.


Fans painted blue.   Yellow paint dabbed in spots along "rays".


Attached decorated block to fan.   I attached using E-6000 glue.   Once dried I also hammered a finishing nail in thru back side.


Finished look.   Stickles were also added to bling it up a bit.


Once everything was dry, I sprayed the bookends with a clear acrylic coating.

Sunday, May 27, 2012

Let's Play Dress-up

Little time-out stool for Neely painted in a melon color.   The little girl playing dress-up is from A Child's Year Cricut cartirdge.   Font for "Neely" is from Songbird Cricut cartridge.   Flowers are from Accent Essentials Cricut cartridge.   Paper colors are from Imagine More Cards Cricut cartridge.  Stool is accented with ribbon, butterflies, stickles and Glossy Accents.  Green twine used to accent ribbon image on front of dress.


Card has been added. Castle on front of card from Life a Party Cricut cartridge.


Saturday, May 26, 2012

Pretty Pricess Stool for Haley

Pretty Princess Stool for Haley.   Crown and "Pretty Princess" cuts from Life's a Party Cricut cartridge.   Flower cuts from Accent Essentials Cricut cartridge.  "Haley" font from Songbird Cricut cartridge.   Accented with stickles, glossy accents, tulle and butterlies.

Saturday, April 28, 2012

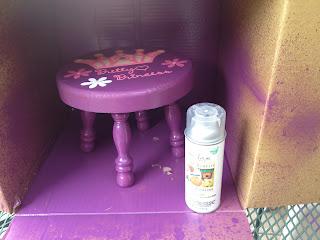
Pretty Princess Stool

Pretty Princess Stool - finished look

I spotted a little unfinished stool at Hobby Lobby yesterday for $14.99.   I really didn't pay that much - used my 40% coupon.


I spray painted the stool in a glossy plum color.


While the paint was drying, I cut out this crown and "Pretty Princess" font from Life's a Party Cricut cartridge.   Crown cut at 4 inches.   "Pretty Princess" font cut at 2 inches.


Once the stool dried, I applied the cuts to the stool with mod podge. Once mod podge dried, I applied stickles to the crown (for jewels) and Viva Decor to center of flowers. Flowers were cut at 2 inches from Accent Essentials Cricut cartridge.

Next morning:  I applied Clear Acrylic Gloss Coating.  Dries really fast - 2 minutes!


Finishing touches - hot pink tulle tied in bows around legs of stool.


And here is the final result.