Showing posts with label Create a Critter Cricut cartridge. Show all posts

Saturday, March 23, 2013

Super Hero Shelf

And BTW - I'm Published!  I can't tell you how excited I am to have my project published in Cricut Home Decor 2012 Idea Book (although it's really a magazine.)

My shelf is on pages 92-93.  Here's the layout:


I think the photographer did an excellent job.   Here's how the same shelf looks at my house.
   

Super Hero Shelf

Some closeup pictures (taken by me)
Letter "A" and Spaceship
Super Hero Dog
Super Hero Car and Letter "P"

This shelf was created for my two grandsons Andrew and Paul (hence initials "A" and "P"). They are both super hero fans. Andrew's favorite super hero is Captain America and Paul's favorite is Batman. Their mother Kristin convinced me to help her decorate their room in a Super Hero theme using Cricut cuts. It's been great fun. Since the shelf we have added bookends and wall art using Cricut cuts.

The editor's were able to condense my VERY DETAILED instructions down to just a half of a page.  Here is the instructions that I originally sent to them with the shelf:
  1. Paint shelf using Apple Barrel Bright Red acrylic paint (Two coats)
  2. Paint shelf hangers in four different colors:
    • Craftsmart Mediterranean Blue acrylic paint
    • Apple Barrel Spring Green acrylic paint
    • Apple Barrel Real Yellow acrylic paint
    • Apple Barrel Cloudless acrylic paint
  3. Initial "A"
    • Cut using green card stock from Plantin SchoolBook Cricut cartridge. Roly Poly on page 32of the handbook at 2.25 inches.
    • Attach to shelf using Mod Podge Gloss.
    • Once dried, accent with Inkssentials Glossy Acents.  I completely coated the letter using Glossy Accents.
  4. Orange Spaceship
    • Cut spaceship using orange card stock from Paper Doll Dress Up Cricut cartridge.  Accessories 3 <suprgl> on page 57 of handbook at 3 inches.
    • Cut lightening bolt for spaceship with yellow card stock from Paper Doll Dress Up Cricut cartridge. Accessories 3 <vmpris-s> on page 51 of handbook at 0.653 inches.  I used the Cricut Craftroom to make sure lightening bold would fit the spaceship.
    • Attach lightening bolt to spaceship using Zig 2 Way Glue.
    • Attach spaceship to shelf using Mode Podge Gloss.
    • Once dried, accent with Ranger Liquid Pearls in the Bisque color.
  5. Super Dog:
    • Cut red cape out of red glitter card stock from 3 Birds on Parade Cricut cartridge.  Layer 2 <Suprhero> on page 69 of handbook at 1.097 inches.  Use the Cricut Craftroom to size and make cuts.  Cut off the leading tie portion of the cape.
    • Cut the yellow symbol on cap from yellow glitter card stock from 3 Birds on Parage Cricut cartridge.  Layer 1 <Suprhero-s> on page 69 of the handbook at 0.5 inches.  Attach symbol to cape using Zig 2 Way Glue.
    • Cut shadow of Terrier out of black card stock from Create a Critter cartridge.  Shadow on page 34 of the handbook at 2.389 inches.
    • Cut 1st layer of Terrier out of brown card stock from Create a Critter cartridge.  Layer 1 on page 34 of handbook at 2.389 inches.
    • Cut another Layer 1 out of blue card stock at 2.389 inches.  Cut off the dog's feet to use as boots.
    • Cut 2nd layer of Terrier out of light tan card stock from Create a Critter cartridge.  Layer 2 on page 34 of handbook.  Real dial size for this cut is 1.556 inches.
    • Cut collar out of yellow glitter card stock from Create a Critter Cricut cartridge.  Layer 3 on page 34 of handbook.  Real dial size for this cut is 0.083 inches.
    • Cut mask out of blue card stock using the Raccoon from Create a Critter cartridge.  Layer 2 on page 33 of handbook.  Real dial size for this cut is 0.458 inches.  Use the Cricut Craft Room to assist in sizing.
    • Cut the super hero symbol out of red glitter paper from the Paper Doll Dress Up Cricut cartridge.  <suprby-s> on page 56 of the handbook.  Real dial size for this cut is 0.25 inches.  Use the Cricut Craft Room to assist in sizing.
    • Put the terrier together with Zig 2 Way Glue.  Add the raccoon mask and blue boots as well as the red cape to create the costume.
    • Attach to shelf using Mod Podge Gloss.
  6. Super Hero Car
    • Cut two circles out of silver glitter card stock using the Cricut Craft Room Basics (free).  Cut at 0.667 inches.  These will be used for the car wheels.
    • Cut the car out of black card stock using the Paper Doll Dress Up Cricut cartridge.  Accessories 3 <suprby-s> on page 56 of the handbook.  Cut at 2.208 inches.  Use the Cricut Craft Room to remove contour cut lines.
    • Cut lightening bolt for front of car out of yellow glitter card stock using the Paper Doll Dress Up Cricut cartridge.  Accessories 3 <vmpris-s> at 0.556 inches height x 1.875 inches width (resized using Cricut Craft Room).
    • Cut two flames for back of car out of yellow and orange glitter card stock using the Paper Doll Dress Up Cricut cartridge.  Accessories 3 >vmpris-s> at 0.361 inches height x 1.208 inches width (resized using Cricut Craft Room).
    • Attach flames and wheels to car using Zig 2 Way glue.
    • Accent car fin using Ranger Liquid Pearls Bisque.
    • Attach car to shelf using Mod Podge Gloss.
  7. Initial "P"
    • Cut using green card stock from Plantin SchoolBook Cricut cartridge.  Roly Poly on page 47 of handbook at 2.25 inches.
    • Attach to shelf using Mod Podge Gloss.
    • Once dried accent with Inkssentials Glossy Accents.  I completely coated the letter using Glossy Accents.
  8. Accent top portion of shelf:  make dots using Ranger Liquid Pearls Bisque color.
  9. Once everything is dry, spray the entire shelf as well as the cuts using Tree House Studio Clear Acrylic Gloss Coating.

Saturday, October 20, 2012

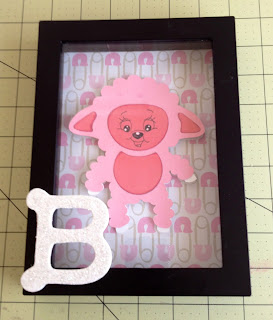
Baby Decor Shadow Boxes

Supplies:

Set of 4 Shadow Boxes = purchased at Michaels, 5" x 7" ($9.99 for set)

Glitter Letters = "B", "A", "B", "Y", purchased at Michaels, 2.75" (.98 cents each)

Two sheets of 12" x 12" baby decor paper = cut into four 5" x 7" sheets for shadow box background, purchased at Hobby Lobby.

Letters "B" were attached to outside of shadow box using 3M Scotch Quick Dry glue.  Letters "A" and "Y" were attached to outside of glass using Glossy Accents.

Owl = cut at 4.75" from Cricut Create a Critter cartridge, , page 25 of folder.   Leaf branch under owl's feet is from a Martha Stewart punch.

Cut two (seen in dark blue).   First cut is attached using Quick Dry glue.   Assemble rest of Owl and attach on top of first cut with Pop Dots to give 3D effect.

Giraffe = cut at 5" from Cricut Lite Sugar and Spice cartridge, , first column of folder.

Cut two (seen in light green).   First cut is attached using Quick Dry glue.   Assemble rest of Giraffe and attach on top of first cut with Pop Dots to give 3D effect.

Lamb = cut at 5" from Cricut Lite Sugar and Spice cartridge, , first column of folder.

Cut two (seen in white).   First cut is attached using Quick Dry glue.  Assemble rest of Lamb and attach on top of first cut with Pop Dots to give 3D effect.

Face on Lamb is a Peachy Keen stamp = PK-757 Wide Eyed and Bushy Tailed Face Assortment, 1 3/8".


Deer = cut at 5" from Cricut Create a Critter cartridge, , page 69 of folder.

Cut two (seen in dark brown).   First cut is attached using Quick Dry glue.   Assemble rest of Deer and attach on top of first cut with Pop Dots to give 3D effect.

Collar on deer has Stickles added to it.

Saturday, July 7, 2012

Christmas Is On It's Way

Christmas In July - Challenge #1 
    • CardzTV:  Make a Christmas card using a hand stamped, digital stamped or Cricut cut image of an animal, and any colors you'd like!  

This is an A2 size card.   All images and cuts are from Create a Critter Cricut cartridge.   All paper colors are from Enjoy the Seasons Imagine cartridge.


Friday, June 15, 2012

Gum Ball Name Chart

Large Gumball machine for back to school bulletin board. Gumballs will have student's names on them. There will be letters saying "We're going to have a 'ball' in Pre-K!"                                       


Entire display is 46 inches in height.   Each gum ball is a 4 inch circle that will be labeled with a student's name.

Red base is 18" x 20 ".
Red top is 16" x 5 1/2".
Bow tie on front was created from Create a Critter Cricut cartridge (bow tie found as accessory for the hedgehog image).   Bow tie cut at 4 inch width.
The white gum ball top consists of two half circles :  25 inches in diameter and 12 1/2 inches in height.   Two half circles joined create the 25 inch circle.

Tuesday, June 5, 2012

Super Hero Book Ends

Calling all Super Heros!

This was such a fun project to make.   It's rather simple, but time consuming.

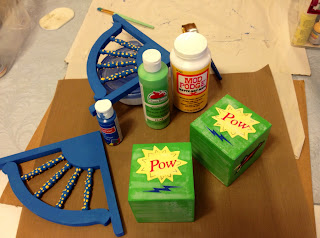
First I purchased two 3 1/2 inch wood blocks from Michaels and one fan corner bracket at Lowes (package has both fans needed).


Paint and mod podge images.


Here are the images I used:


1.   Super Boy - cut from Paper Doll Dress-Up Cricut cartridge.   Letter "P" from Plantin Schoolbook.  Face on boy from Peachy Keen stamps.

2.  Super Dog - cut from Create a Critter Cricut cartridge (Terrior).   Mask is from the racoon on Create a Critter.   Cape is from 3 Birds on Parade.   I cut an additional Terrior in all blue and trimmed to get his boots.

3.  Pow - yellow part from Paper Doll Dress-Up (super boy cut accessory).  Blue lightening from Paper Doll Dress-Up (vampire cut accessory).  "POW" font from Plantin Schoolbook.


4.  Yellow lightening - Paper Doll Dress-Up (super boy cut accessory).

5.  Orange space ship - Paper Doll Dress-Up (super girl cut accessory).  Blue lightening from Paper Doll Dress-Up (vampire cut accessory).

6.  Black Car - Paper Doll Dress-Up (super boy cut accessory).  Silver wheels on car are a circle cut.   Orange and yellow lightening / flames are from Paper Doll Dress-Up (vampire cut accessory).  "P" on car from Plantin Schoolbook.


Fans painted blue.   Yellow paint dabbed in spots along "rays".


Attached decorated block to fan.   I attached using E-6000 glue.   Once dried I also hammered a finishing nail in thru back side.


Finished look.   Stickles were also added to bling it up a bit.


Once everything was dry, I sprayed the bookends with a clear acrylic coating.

Sunday, June 3, 2012

Super Hero Room Decor

Super Paul has some new designs coming to his bedroom!

Super hero created at 10.5 inches from Paper Doll Dress Up Cricut cartridge. "P" fonts on super boy and car from Plantin Schoolbook. Dog cut at 5 inches from Create a Critter Cricut cartridge. His mask came from the racoon cut on same cartridge. Dog's cape is from 3 Birds on Parade. Car is from Paper Doll Dress-Up cartridge. Flames on car are from the vampire cut on same cartridge.


Face on super boy were hand drawn.

Sunday, May 6, 2012

Time Out Stool - Owl


Time Out Stool / Baby Gift.   Owl and tree branch are from Create a Critter Cricut cartridge (owl cut at 3.8" and branch at 4").   Background cloud paper from Best Friends Imagine cartridge (circle cut at 9.5").   Kite is also from Best Friends Imagine cartridge (cut at 2").


Blue twine added between kite and tree branch.  Red twine used to outline kite and yellow twine added to center of kite.

 "Silas" font is from Songbird Cricut cartridge - letters were welded together via Cricut Craft room.   Glossy Accents was added to top of kite.   Stickles added to "Silas", leaves and Owl.   Ribbon attached around side of stool using Tacky Glue.

Paper colors are from Best Friends Imagine cartridge.  Images were all attached using Mod Podge.

Thursday, April 19, 2012

Congrats! Graduation Card.


Congrats!  Made using Create a Critter (owl), Everyday Paper Dolls (cap and tassel) and Enjoy the Seasons Imagine (colors on card).   Embossed using Cuttlebug Daisy folder.  Highlighted using stickles and 3D glaze pens.

Monday, April 9, 2012

Snail Mail


"Snail Mail" created using Create a Critter Cricut cartridge.  Background is also from Create a Critter Cricut cartridge.   Embossing from Cuttlebug Birds and Swirls.


Scanned image of front of card.   Butterfly is from Martha Steward punch.

Bee Happy Card


"Bee Happy" card created using Create a Critter Cricut cartridge.


Backside of card.   Bee and hives made using Create a Critter Cricut cartridge.  Liquid Applique used on top of green hive.


Scanned image of front of card.


Scanned image of back of card.

Wednesday, April 4, 2012

Fishing You a Great Day


Fishing you a great day - Create a Critter Cricut cartridge. Large fish cut at 2.25", Middle fish cut at 1", Small fish cut at .75".


Fishing you a great day - inside - Create a Critter Cricut cartridge.  Sentiment from Scrappy Moms stamp set "Amusing Animals".

Tuesday, April 3, 2012

"Hoo-Ray" Birthday Invitations


"Hoo-Ray" - birthday invitation - created with SVGCuts (scalloped gatefold card) and Create a Critter Cricut cartridge (owl peeking out). Invitation card embossed using Daisy Cricut folder.


"Hoo-Ray" - birthday invitation - inside of card (party date, time, place to be added later). Owl created using Create a Critter Cricut cartridge.


"Hoo-Ray" - birthday invitation envelope - butterflies created using Martha Stewart Butterfly punch. Envelope created using SVGCuts.


"Hoo-Ray" - birthday invitations, envelopes and party favors. Each invitation was unique. Created using Cricut's Create a Critter cartridge and Daisy embossing folder. Butterflies from Martha Stewart punch.

Sunday, April 1, 2012

Dinosaur Birthday Card


Dinosaur Birthday Card using Create a Critter Cricut cartridge and Action Wobble.  Leaves are embossed using Cuttlebug Floral Screen folder.

Action Wobble


Inside of card - volcano from Create a Critter Cricut cartridge.

Snappy Birthday - Crab


"Snappy Birthday" - created using Create a Critter Cricut cartridge. Stamp from My Pink Stamper.


"Snappy Birthday" - inside - turtle created using Life's a Beach Cricut cartridge.

Snappy Birthday - closeup
Inside card - closeup


Snappy Birthday - Alligator


Snappy Birthday - created using Create a Critter Cricut cartridge.


Snappy Birthday - inside - created using Create a Critter Cricut cartridge and My Pink Stamper stamps.

Saturday, March 31, 2012

Circus Train


Circus Train Baby Card - made using Create a Critter Cricut cartridge.

Baby Fawn


Boy Baby Fawn - created using Cricut cartridges Create a Critter and Sugar and Spice (Baby text)


Girl Baby Fawn - created using Cricut cartridges Create a Critter and Sugar and Spice (Baby text)