Showing posts with label Sublimation. Show all posts

Saturday, March 9, 2019

Sublimated Cheer Hair Bow


Directions for designing:

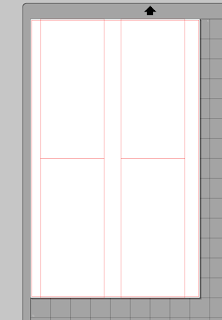
I used Silhouette software to create this design.   For each side of the bow you will need to make two rectangles 3.2" wide and 7" tall.  Stack rectangles on top of one another.   Copy these two rectangles for other side of bow.


Open up Pattern Fill Window and fill each rectangle.   The top rectangles will be your loops and the bottoms will be your bow tails.  I purchased this digital paper pack from an Etsy shop and copied the images into My Patterns folder within Silhouette. 


Add any additional images or text you would like on your bows.  Don't forget to "reverse" before printing onto your sublimation paper.


Print on legal size 8.5" x 14" sublimation paper.    Once printed cut down center of paper in order to heat press the bow.

Your bow will need to be 3" wide white grosgrain ribbon.   Cut to a 30" length.  Before heat pressing I cut the spikes on the tails.   

Place sub transfer paper on top of one end of the ribbon and heat press at 400 degrees for 60 seconds.   I use a little heat tape to hold in place.  Remove transfer paper.   Repeat for other end of ribbon.   

Note*  Align the ribbon ends to bottom of transfer.   Once done you'll have two ends of the ribbon pressed with the images and there will be a 2" white section in the center that is unpressed.   This will be the center of your bow.

Folding and assembling the cheer bow:   

Best way to learn is to follow this YouTube - it's how I did mine.  

Enjoy!

Saturday, November 10, 2018

St. Michael the Archangel Zipper Couch

I'm feeling a little domestic today! 

Doing a little sewing today by creating this zipper pouch. The fabric started out as just white polyester. I created a design similar to my previous garden flag and sublimated the white polyester thus creating my own fabric. The inner fabric was a red cotton scrap that I had on hand. I also located a red zipper in my stash and from there sewed it all together. The pouch measures 10" x 12.5.


Previous garden flag:


Thank you for joining me today!

Thanks For Helping Me Grow!

I've had a busy week making teacher thank you gifts.   The process is done via sublimation.

I purchased these darling garden stakes from Conde and sublimated the top (front and back) to added to the plants.


Thanks for joining me today!  ~ Marilyn

Friday, May 11, 2018

Personalized Door Mats

I've had a busy week making personalized door mats.   The process is done via sublimation.


Supplies:
Blank door mat :  mine was purchased at Home Depot
Sublimation :  printer, ink and heat press
Design :  Silhouette Design software

1.  First purchase the blank door mat  - mine were found at Home Depot


2.  Next decide what design you want on your door mat.   I used Silhouette software.   The split frame image was purchased from the Silhouette store.

3.  Print on sublimate transfer paper (using sublimation printer with ink).   Printed on 11" x 17" sublimation transfer paper.

4.   Press at 400 degrees for 60 seconds using pressure of 2-3.   I use heat tape to hold the paper to the mat while pressing. 


Remove transfer paper and enjoy. 

These would make great house warming gifts.


Thanks for joining me today!  ~ Marilyn

Saturday, December 30, 2017

Love Birds Pillow

So, I have this old pillow at my house.  It was given to my husband years ago by one of his friends and it says something about beer on it.   I liked the size, but the beer message - no so much.   Just doesn't go with my style. 

I measured the pillow and it came to 9.5" x 14".   Time for a remake.   I have scraps of fabric and we are hunkered down at home due to the cold weather. 

Using my Silhouette / Sublimation / Sewing skills today. 


I cut a piece of white polyester fabric at 8.5" x 8.5" and sublimated the love birds on it.


  • These love birds are available in the Silhouette Store:  Design Id # 39240.
The rest is just adding a strip here and a strip there to come to the size I needed.  The back of the pillow is an envelope closure.


Square 1 Printable:

Using the very same design, I printed the Love Birds and Hearts on Square 1 Printable.

Love Birds on a mirror

Love Birds on a microwave oven
Close-up of Love Birds on microwave oven


Thanks for visiting,

Marilyn

Sunday, December 10, 2017

Snowman Family Ornaments

Hello, Friends!  Marilyn here with a sublimation project.

I making some family ornaments for Christmas.

Snowman Family Ornaments


To make you'll need:
  • Sublimation blank ornaments
  • Sublimation ink / paper / printer
  • Heat press
  • Snowman family template
Sublimation blank ornaments:
Snowman Family Template:
Create Ornaments:
  • Modify your snowman family template with your family names / Christmas message (text on the sign).   Size the round portion at 2.75 plus about .1 for offset.  
  • Heat press with light pressure for 40 seconds at 400 degrees.
  • Cool ornament under a heavy object (like a big book) to keep from warping.
  • Repeat process for other side of ornament.
  • Put red ribbon (comes with the ornaments) through hole and add to Christmas Tree.


Merry Christmas!

Thank you for visiting today! ~ Marilyn

Saturday, September 23, 2017

Fall Mason Jars Pillow

Hello, Friends!  Marilyn here with a easy sewing / sublimation project.

This pillow is basically an envelope closure pillow that has a white polyester strip and ruffle on the front.   The finished pillow size is 18" x 18".

Fall Pillow

Supplies:

  • Cotton fabric for pillow.
  • Polyester fabric for front sublimation area
  • Ruffle / lace strip
  • Mason jar & flowers image - design # 93368 purchased from Silhouette store (.99 cents)
  • 18" x 18" pillow form (mine was purchased at Hobby Lobby)

Steps:

  • From blue cotton fabric:  cut one at 19" x 19", cut one at 19" x 13", cut one at 19" x 14".
  • From white polyester fabric:  cut one at 19" x 8"
  • From ruffle strip:  cut at 19" length
  • Size the mason jar & flowers image at 9" x 5" and flip horizontally.  Sublimate onto the white polyester fabric.
  • Following sublimation, serge the long edges of the white polyester.
  • Sew the white polyester in the center of the 19" x 19" blue fabric.  I sewed all four edges.
  • Sew the ruffle strip on the bottom edge of white polyester.
  • Sew a 1 inch hem on the 19" x 13" and 19" x 14" fabric pieces.
  • With right sides together, sew along all four sides of pillow fabric.
Finish:
  • Flip the pillow right side out
  • Inset 18" x 18" pillow form

Need a visual on sewing an envelope pillow?  Here's a good YouTube:  Envelope Pillow Beginner


Thank you for visiting today! ~ Marilyn

Sunday, July 30, 2017

Reading Pillow

Hello, Friends!  Marilyn here with a school fundraiser project.  I was asked by a teacher at a local elementary school to make some bingo prizes.

I created this Reading Pillow with an envelope closure on back and a cute image on the front.  The wrap portion seen on the front is used to insert a book.  I'm thinking this idea would be cute at Christmas time using different fabric and image and inserting new Christmas pajamas.

Finished pillow measures 14" x 14"

You'll need some basic sewing skills to create this envelope closure pillow.

Fabric Cutting:
  • Front of pillow :  ABC fabric cut 15" x 15".
  • Back of pillow:  two cuts of  ABC fabric  10" x 15"  and 11" x 15"
  • Wrap:  one cut of white polyester fabric 7.5" x 15"

Sublimation Part:  
  • Image of panda as well as the text were purchased for $3.00 from Etsy store BizzyLouDesigns
I opened the Panda image into my Silhouette software and changed the colors to my preference.  I also sized the image to 4.5" x 9.5"  to fit my wrap fabric.  Image was then "flipped" horizontally and printed onto Sublimation transfer paper.   Then I heat pressed the image onto my white polyester fabric at 390 degrees for 60 seconds.  

Sewing Part:

After cutting fabric, hem the two back ABC fabric pieces.  Hem both the top and bottom of the white polyester wrap - that now has the Panda and Text.

Position the white wrap onto the front ABC fabric and pin in place.  With right sides together, pin the two back fabric pieces to the front.   Sew 1/2" all the way around.   I also serged the edges.  
Flip right side out - and it's done!

Additional purchases:
  • Pillow form for $7.99 from Hobby Lobby (before 40% off coupon)
  • Pete the Cat book for $10.99 from Sams
Finished pillow with book

Couldn't stop with just one!  Made two other pillows.


Thank you for visiting today! ~ Marilyn