Saturday, September 27, 2014

Car License Plate

Hello, Friends!   Recently my granddaughter purchased her first car - a darling little Mini Cooper.   She looks totally adorable in it!    She named her sweet little ride "Sir Charles II".  Which is my inspiration for today's project.


Here's what I used for this project.

  • Blank license plate 
  • Square1 Printable
  • Green spray paint
  • Internet images
  • Silhouette software
  • Cameo cutter


Step 1:  Spray paint blue license plate a green color to match her car color.


Step 2:  Design image for license.  I found the UK lion image as well as the British flag and incorporated them together with her car's name.


Step 3:  Image was printed using Square1 Printable and applied directly to the license plate.


I hope you enjoyed my project!  ~ Marilyn

Saturday, September 20, 2014

Pumpkin Patch Home Decor

Hello, Friends!  Marilyn here with an autumn home decor project.


Here is what you'll need to make this:


  • Wooden Plaque - purchased at Michaels for $4.99 (with 50% coupon cost was $2.50)
  • Paint - purchased at Michaels.  Each color cost $ .33 each
  • Mod Podge
  • Images created with either Cricut or Silhouette
  • Twine for hanging


Step 1:  Paint your wooden plaque.  I selected green, orange, brown and tan.


Step 2:  While your wooden plaque is drying, create the images you'll use to decorate with.


Step 3:  Put a thin layer of Mod Podge on painted wooden plaque and lay your images on top.


Step 4:  Once the Mod Podge has dried, add some twine for hanging on back and enjoy!


Thank you for visiting today! ~ Marilyn

Friday, September 12, 2014

Faux Pockets

Hello, Friends!  Marilyn here with a faux pocket project.  I saw several of these while scanning Pinterest and thought I would give it a try.

Here's what you'll need:

  • Square 1 Iron-On - 1 sheet for both shirts will work.
  • Iron or Heat Press - if using a heat press, set it at 325 degrees for 4 seconds.
  • Silhouette Software
  • Silhouette Cameo
  • Ink Jet Printer
  • Blank T-Shirts


Faux Pocket T-Shirts

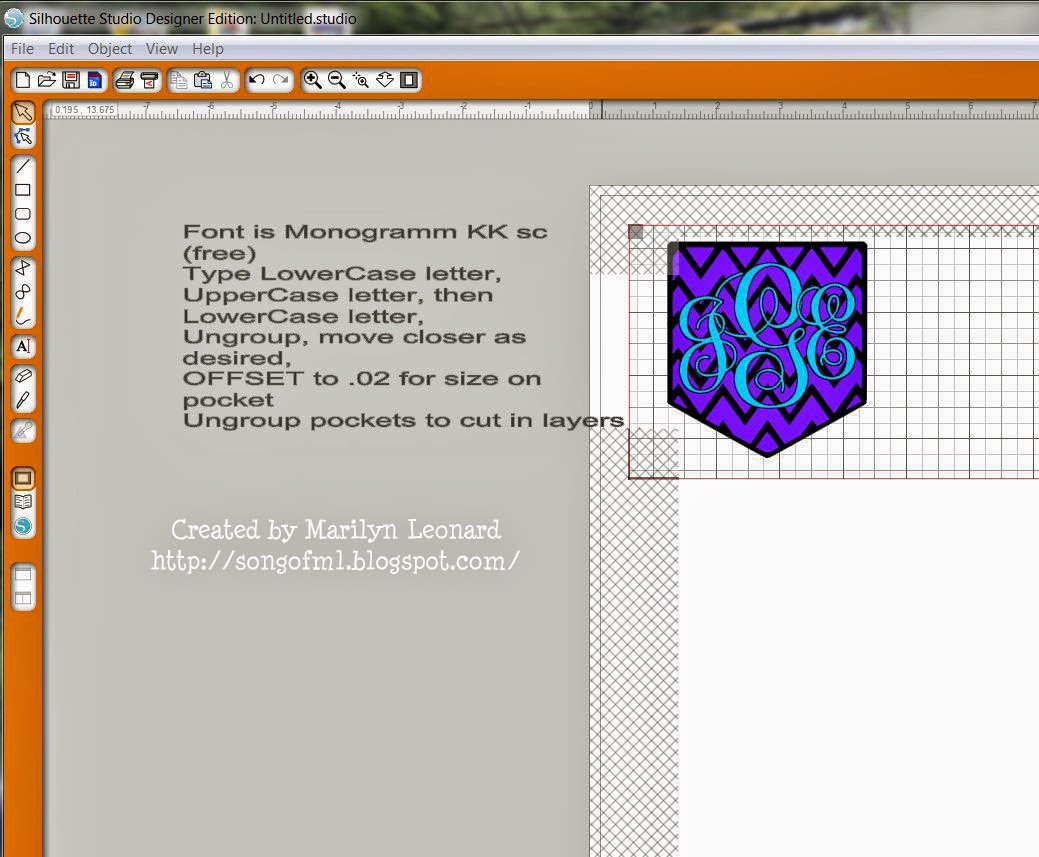
To make these, first design your pocket using Silhouette software.  I got the pocket outline from a Facebook Silhouette group (Happy Sil) and added the initials I wanted :  first initial, last initial, middle initial.


Use the Monogramm KK SC font to make yours like mine.  I had to ungroup the initials then offset each by 0.01 to make the initials thicker.


Once done with designing, send the image to your ink jet printer and cut using your Cameo.


Decide where you want the faux pocket placed on your tee and heat press in place.


And you're ready to wear your tees!

Thanks for visiting today! ~ Marilyn

Saturday, September 6, 2014

Friendship Algorithm T-Shirt

Hello, Friends!  One of the benefits of having a heat press in your home is being able to make your own t-shirts on a whim.   Here is a tee made using the The Big Bang Theory's character  Sheldon Cooper flow-chart on making a new friend.


This particular t-shirt will be worn by my grandson Andrew at his middle school.

Thanks for stopping by! ~ Marilyn

Friday, September 5, 2014

Pillow Talk

Hello, Friends!  Marilyn here with a heat press / pillow project.  These cases would be a great wedding or bridal shower gift.

Finished Mr. and Mrs. pillow cases

Here's what you'll need to create this:

1.  Pillow Cases - purchased my set from Walmart for about $12.94.

Pillowcases purchased at Walmart

2.  Type in "Mr and Mrs" using font Chopin Script (free download from dafont.com).  Add a heart and place where the period would appear after Mr. and Mrs.  I sized my as large as I could fit onto an 11x17 page since I was using king sized pillows.

Type your last name smaller to fit the ends of the pillow cases.

Screen shot of Silhouette work area

3.  Print and heat press at 375 degrees for 20 seconds.  Use a hot peel process.

Last name on end of pillow case


4.  Put the pillows in your cases and enjoy!

Add a heart in place of the period after Mr. and Mrs.

Thank you for visiting today! ~ Marilyn

Monday, September 1, 2014

SBC September Card Kit

Hello, Friends!  Today kicks off another card kit by the SBC team.  September's kit contains some beautiful designer papers, flowers, ink, sparkle spray, washi tape, tags and a fun stamp.  Here are some of the cards I created from my kit:


Card #1:
Cute little mouse stamp that I water colored.  I took some of the designer paper and punched out hearts for my embellishments.  The center mouse image and mats are mounted with foam tape.


Card #2:
Lots of pretty white flowers come with the kit.  Also included is sparkle spray that I used on my flowers before attaching.  I used a heart punch that I already owned to make the centers of the flowers.   The sentiment stamps on this card are not included.

The sentiment on this card is not included. 

Card #3:
Two different sized tags come with the kit.  The smaller one has been sprayed with the included sparkle ink.  Washi tape and many different stickers are also included.  I made the moon using a circle punch and some of the designer paper in the kit.


Thanks for stopping by!  Pick up your kit today!

Blog List:
Marilyn - Marilyn's Crafts

~ Marilyn