Saturday, November 30, 2013

Choo-Choo Train

Hello, Friends!  My card today was created using a digi stamp from A Day For Daisies.  I love their Choo-Choo train.  It was advertised as a Christmas train, but I needed a birthday card and used the train for it.

  • Digital Image:  Choo-Choo Train from A Day For Daisies
  • Silhouette Images:  Clouds, Banners from Silhouette Store
  • Designer Paper:  Echo Park "Bundle of Joy" 6"x6" pack
  • Embossing:  Cuttlebug "Swiss Dots" folder
  • Sentiment:  Scrappy Mom's "Hooray for Birthdays" stamp set


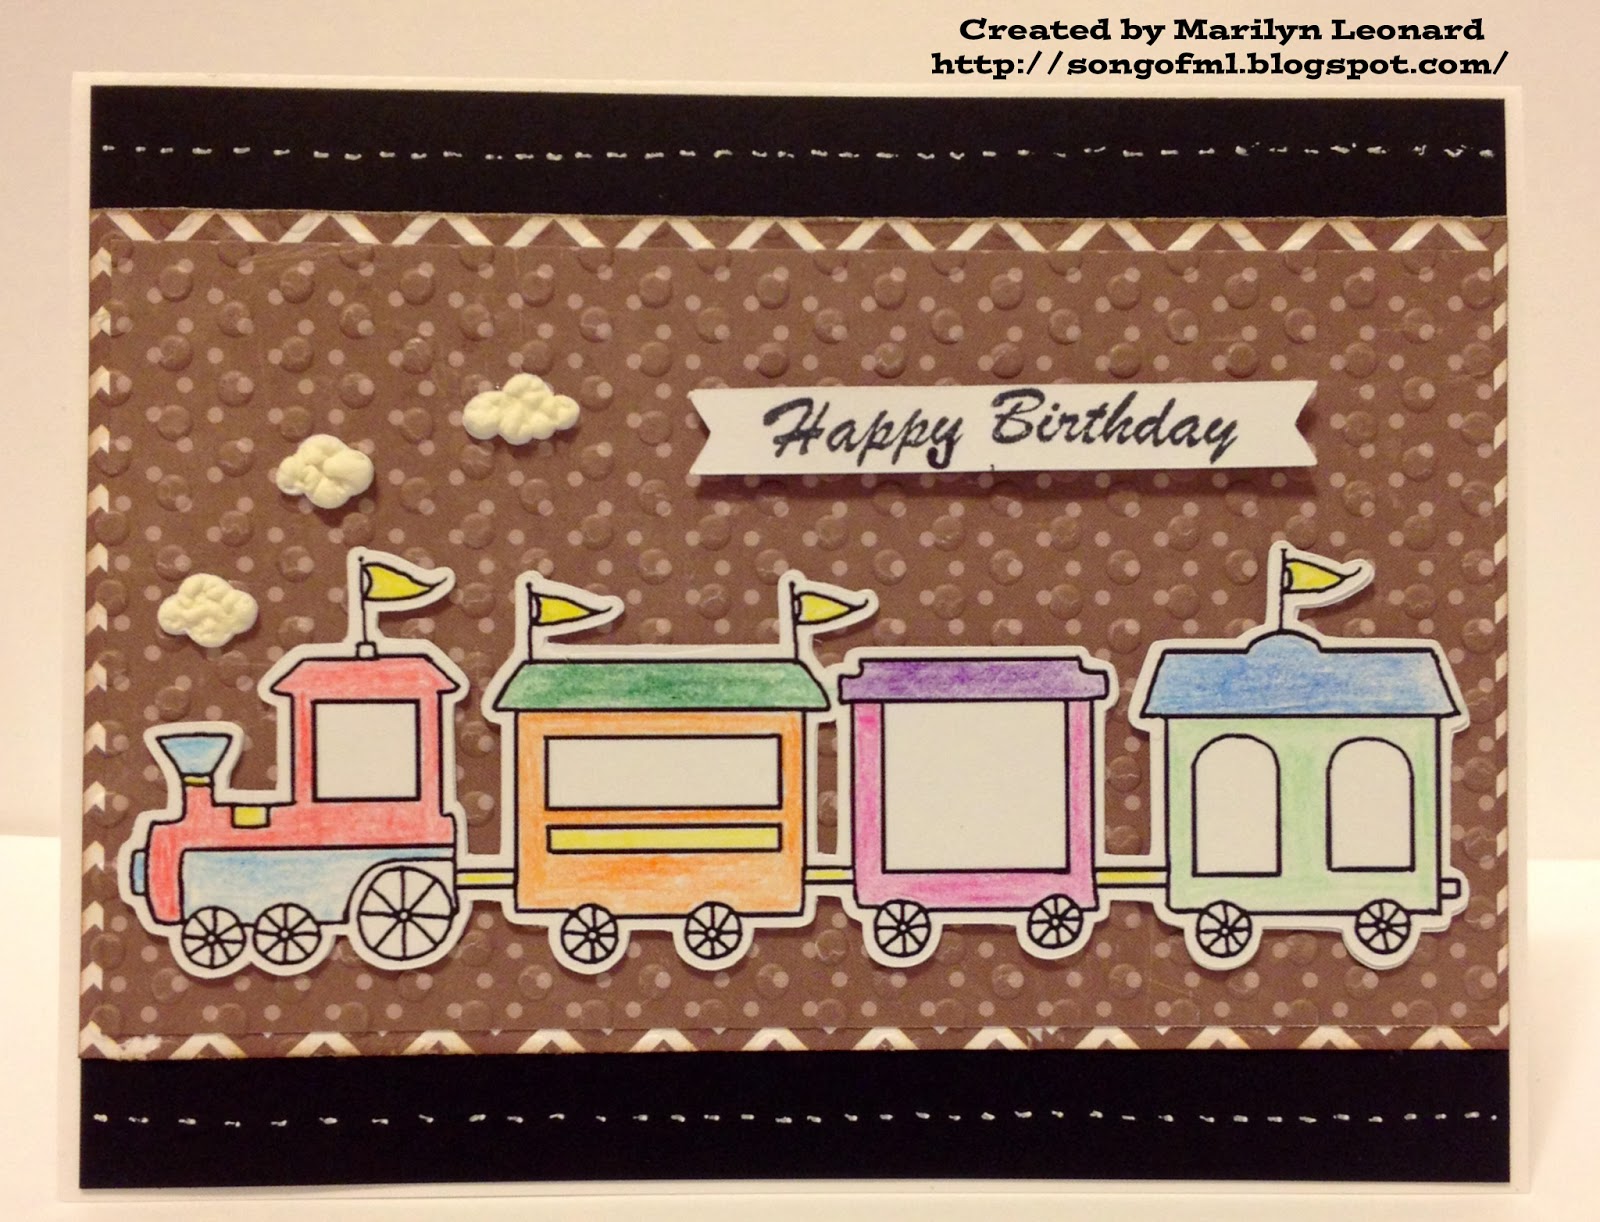
A2 sized card = 5.5" x 4.25"
Digital Image from A Day for Daisies
Card Recipe:
  • Mat 1 (black) = 5 3/8" x 4 1/8".  White gel pen used for faux stitching.
  • Mat 2 (brown chevron) = 3 1/8" x 5 3/8"
  • Mat 3 (brown polka dots) = 3" x 5 1/4".  Mat embossed with Cuttlebug "Swiss Dots" folder.
  • Train = 5" in length.  Digital Image from A Day for Daisies.  Silhouette used to trace, offset and cut.  Image was colored with colored pencils.

  • Clouds = .355" in length.  Clouds purchased though Silhouette Store, Lori Whitlock design.  Liquid Applique added and heat embossed to create fluffy-ness.
  • Banner = 2.25" in length.  Banner purchased through Silhouette Store, Lori Whitlock design.  Banner mounted with foam tape.
  • Sentiment = from Scrappy Mom's "Hooray for Birthdays" stamp set.

Inside of Card
Inside of Card:
  • Mat 1 (black) = 5" x 3.75"
  • Mat 2 (white) = 4.75" x 3.5"
  • Train = Traced outline of digi stamp from A Day For Daisies.  Image resized to 2" length.  Silhouette used to trace and cut.  Look how tiny the flags were cut!  Oh, Silhouette, how I love thee. 

Thank you for visiting my blog today.  As always, comments are welcomed and appreciated.

~ Marilyn

Friday, November 29, 2013

Reindeer Table Runner

I really love the HTV glitter vinyl.  So simple to cut and iron-on.  Today my sister-in-law came over and we added two reindeers and some snowflakes to her table runner using the gold glitter HTV made by Cricut.

  • My sister-in-law is the seamstress in the family.  She made the table runner and wanted to add some bling to it.

  • Reindeer = cut at 8.5" from Cricut Joys of the Season cartridge using the blackout feature.  There is one reindeer at each end of the table runner.

  • Snowflakes = cut from  2.5" up to 3.5" using Cricut Joys of the Season cartridge.  Blackout feature was used.  Snowflakes were added to the center of the table runner.

Thank you for visiting my blog today.  Comments are welcomed and appreciated!

~ Marilyn

Gingerbread Man Shadow Box

Here's a fun Christmas project made with an 8" x 10" shadow box and Square1 printable.  Once created, I hung this on a wall in my kitchen.

Sugar and spice make the Holidays nice!
  • Shadow Box:  8" x 10" purchased at Michaels.  They usually are packaged in a group of 3.
  • Background paper:  glitter paper.  I purchased this in a pack from My Craft Spot.
  • Gingerbread Man and Text:  Images created on my Silhouette Cameo.  Shadow added around green text (using offset feature).  Images are sized at 5".  Once created, they were printed on Square1 printable and cut using the Silhouette.
  • Cinnamon Sticks:  The cinnamon sticks inside the shadow box were purchased at my local grocery store. 
Thank you for visiting my blog today.  Comments are appreciated and welcomed.

~ Marilyn

Grinch Ornament


I'm using a new product called Square1 and it has totally spoiled me.  This product is cut and used like vinyl - but oh, soooo easy to use. 

If you purchase Square1 using my link, I will send you the *.Studio file for the Grinch free.  You, too can just print it and cut it.  Super easy!

Just leave me a comment below telling me you purchased Square1 with my link and I'll email the file to you!


  • 2 5/8" glass ornament used
  • Face = print and cut on Square1 printable.  Silhouette Cameo used to cut.
  • Hair = green boa purchased at Michaels.  Hot glued onto ornament.

  • Green glitter used inside of glass ornament.  Use floor wax (something like mop and glo) inside ornament, dump excess out.  Pour in some green glitter and shake.

Thank you for visiting my blog today.  Comments are welcomed and appreciated.

~ Marilyn

Sunday, November 24, 2013

Happy Birthday Octopus

Hello, Friends.   I created a birthday card today using a free digi from the Doodle Pantry.


A2 sized card = 5.5" x 4.25"
Doodle Pantry Digi
Card Recipe:
  • Mat 1 (green polka dots) = 5.25" x 4".
  • Mat 2 (purple) = 5" x 3.75".  Mat embossed with Cuttlebug "Spots and Dots" folder.
  • Mat 3 (green polka dot border) = .25" x 5.25".

  • Octopus = 2.25" digi from Doodle Pantry (link provided above).  Image was traced and cut with offset from Silhouette Cameo.  Image mounted with foam tape.
  • Banner = .5" cut image purchased through Silhouette Store by Lori Whitlock.  Sentiment was typed and printed first from the Silhouette software before cutting the banner.  Banner's shadow created using offset feature.
  • Sentiment = printed on my PC from the Silhouette software using font "Dutch and Harley."

Inside of Card

Inside of Card:
  • Mat 1 (green polka dots) = 5" x 3.75"
  • Mat 2 (purple) = 4.75" x 3.5"
  • Mat 3 (white) = 4.5" x 3.25"
  • Octopus =  1.5" digi from Doodle Pantry (link provided above).  Image was traced and cut from Silhouette Cameo. 

Thank you for visiting my blog today.  As always, comments are welcomed and appreciated!

~ Marilyn

Tuesday, November 19, 2013

One Eyed Monster


  • Image:  Miss Kate's Cuttables
  • Scallop:  The Silhouette Store - Sarah Hurley
  • Designer Paper:  Recollections
  • Sentiment:  Scrappy Mom's "Hooray for Birthdays" stamp set
  • Other:  Liquid Pearls.  Stickles. 
  • Ink:  Tim Holtz Tea Dye Distress Ink.


A2 sized card = 5.5" x 4.25"
Silhouette card
Card Recipe:

  • Mat 1 (green polka dots) = 5 3/8" x 4 1/8"
  • Mat 2 (orange polka dots) = 3/4" x 5"
  • Scallop = cut image at 2"; Silhouette Store Sarah Hurley design.  Offset created at 0.25".  Liquid Pearls added.  Stickles added to "STAR" text.  Edges inked with Tim Holtz Tea Dye Distress Ink.
  • Sentiment = from Scrappy Mom's "Hooray for Birthdays" stamp set.


  • One Eyed Monster = image sized at 3.5" and traced from Miss Kate's Cuttables.  Offset of 0.25 added before cutting.  Monster mounted with foam tape.


Inside of Card
Inside of Card:
Mat 1 (orange polka dots) = 5" x 3.75".
Mat 2 (white) = 4.75" x 3.5".
One Eyed Monster = image sized at 2.25" and traced from Miss Kate's Cuttables.  No offset added.


Thank you for visiting my blog today.  As always, comments are welcomed and appreciated.

~ Marilyn

Monday, November 18, 2013

Big 4-0

  • Cricut Cartridge:  Opposites Attract
  • Designer Paper:  My Mind's Eye "Oxford Lane"
  • Embossing:  Cuttlebug Swiss Dots folder


A2 sized card = 5.5" x 4.25"
Cricut Opposites Attract cartridge
Card Recipe:
  • Mat 1 (black) = 5 3/8" x 4 1/8".  White gel pen used for faux stitching.
  • Mat 2 (stripped design) = 5" x 3.75"
  • Mat 3 (black) = 2.25" x 3.75"
  • Mat 4 (checker design) = 2" x 3.75"

  • Mat 5 (black) = 1.75" x 3"
  • Mat 6 (white) = 1.5" x 2.75".  Mat embossed with Cuttlebug Swiss Dots folder.  Mat mounted with foam tape.
  • "40" = cut image and shadow at 1.75" from Cricut Opposites Attract cartridge.

Inside Card
Inside Card:
  • Mat 1 (black) = 5 1/8 x 3 7/8"
  • Mat 2 (polka dot design) = 5" x 3.75"
  • Mat 3 (white) = 4.75" x 3.5".


Thank you for stopping by my blog today.  As always, comments are welcomed and appreciated.

~ Marilyn

Sunday, November 17, 2013

Twisted Gift Card Holder

Hello, Friends!  The current challenge at Scrapbook Blessing's Club is to create a Twisted Gift Card Holder.  Our tutorial comes from Dawn Griffin's YouTube video.


  • Tutorial:  Dawn Griffin Twisted Gift Card Holder
  • Silhouette Image:  Free Balloon cut and print image
  • Designer Paper:  from My Craft Channel
  • Sentiment:  Scrappy Mom's "Hooray for Birthdays" stamp set
  • Ribbon:  from Michaels


Image from Silhouette Store
Final card will fit into an A2 sized envelope
Card Recipe:

  • Cut Designer Cardstock at 4.25" x 11".
  • Score and fold on the diagonal.
  • Fold in half.
  • Round corners at 1/4".


  • Punch two holes for ribbon.
  • Sentiment = from Scrappy Mom's "Hooray for Birthdays" stamp set.
  • Balloons = from print and cut image from Silhouette store, cut to 2".


Inside of card
Inside Card:

  • Insert gift card / money.  Attach with double-sided tape.
  • Balloons = from print and cut image from Silhouette store, cut to 2".


Thank you for visiting my blog today.  As always, comments are welcomed and appreciated!

~ Marilyn

Tuesday, November 12, 2013

Girl Reading

  • Cricut Cartridge:  A Child's Year.  Base Camp.
  • Designer Paper:  Authentique "Summer" 6"x6" pack.
  • Sentiment:  CardzTV "Encouraging Thoughts" stamp set.
  • Twine:  the Paper Studio
  • Punch:  Martha Stewart Fence punch 
  • Other:  Tim Holtz Faded Jeans Distress Ink.

A2 sized card = 5.5" x 4.25"
Cricut A Child's Year
Cricut Base Camp
Card Recipe:
  • Mat 1 (black) = 5 3/8" x 4 1/8"
  • Mat 2 (print pattern) = 5.25" x 4"
  • Tag = cut image and shadow at 1" from Cricut Base Camp cartridge; [ilov4evr] found on page 124 of the folder.  Bow made out of twine from the Paper Studio.  Edges inked with Tim Holtz Faded Jeans Distress Ink.

  • Girl Reading = cut image and shadow at 3" from Cricut A Child's Year cartridge; [Reading] found on page 47 of the folder.  Image is mounted with foam tape.
  • Sentiment = from CardzTV "Encouraging Thoughts" stamp set.

Inside of Card
Inside of Card:
  • Mat 1 (black) = 5" x 3.75"
  • Mat 2 (beige) = 4.75" x 3.5"
  • Fence = 1" x 4.75" from Martha Stewart punch

Thank you for visiting my blog today.  As always, comments are welcomed and appreciated.

~ Marilyn

Sunday, November 10, 2013

Count Your Rainbows

  • Cricut Cartridge:  Jasmine
  • Designer Paper:  My Mind's Eye "Dolled Up"
  • Sentiment:  Inkadinkado "You Make Me Smile All Over"
  • Punch:  Martha Stewart
  • Accent:  Liquid Pearls
  • Other:  Tim Holtz Faded Jeans Distress Ink

A2 sized card = 5.5" x 4.25"
Cricut Jasmine cartridge

Card Recipe:
  • Mat 1 (dark blue) = 5 3/8" x 4 1/8"
  • Mat 2 (pattern) = 5.25" x 4".
  • Mat 3 (border) = 1.5" x 4.75".  Edges inked with Tim Holtz Faded Jeans Distress Ink.

  • Framed Oval = cut at 3.5" from Cricut Jasmine cartridge; [ovlframe] found on page 119 of the folder.  Liquid Pearls added as accent.
  • Sentiment = from Inkadinkado "You Make Me Smile All Over" stamp set.
  • Butterflies = Martha Stewart punch.  Butterflies are three layers stacked to give depth.  Edges inked with Tim Holtz Faded Jeans Ink.
  • Butterfly Trail = Liquid Pearls

Inside of Card
Inside of Card:
  • Mat 1 (dark blue) = 5" x 3.75"
  • Mat 2 (white) = 4.75" x 3.5"
  • Mat 3 (border) = 1" x 4.75"
  • Butterflies = from Martha Stewart punch

Thank you for visiting my blog today.  As always, comments are welcomed and appreciated.

~ Marilyn

Saturday, November 9, 2013

Penguin Birthday

  • Cricut Cartridges:  Christmas Cheer.  Old West.
  • Designer Paper:  Recollections
  • Sentiment: Scrappy Moms "Hooray for Birthdays" stamp set
  • Punch:  EK Success Scalloped Scallop
  • Accent:  Liquid Applique.  Liquid Pearls.
  • Other:  Tim Holtz Tea Dye Distress Ink.

A2 sized card = 5.5" x 4.25"
Cricut Christmas Cheer
Cricut Old West
Card Recipe:
  • Mat 1 (dark blue) = 5.25" x 4".
  • Mat 2 (blue polka dot) = 5" x 3.75".
  • Mat 3 (dark blue border) = 1" x 4".  Border punched with EK Success Scalloped Scallop punch.
  • Snow = Fluffy snow created using Liquid Applique that was heated with a heat gun.

  • Penguin = cut at 3.25" from Cricut Christmas Cheer cartridge; [penguin] found on page 115 of the folder.  Penguin cut 3 times to create a chip board effect.  Hat is attached with foam tape.  Eyes of penguin created using white gel pen.
  • Sign = cut at 3.25" from Cricut Old West cartridge; [CntryGrl][Rope] found on page 67 of the folder.  Edges inked with Tim Holtz Tea Dye Distress Ink.  Nails created using Liquid Pearls.
  • "HB" and "For you!" = sentiments from Scrappy Moms "Hooray for Birthdays" stamp set.

Inside of Card
Inside of Card:
  • Mat 1 (dark blue) = 5" x 3.75".
  • Mat 2 (white) = 4.75" x 3.5".
  • Mat 3 (blue polka dot) =  1" x 3.5".

Thank you for visiting my blog today.  As always, comments are welcomed and appreciated.

Friday, November 8, 2013

Christmas Scrapbook Layout

Hello, Friends.  I'm getting ready for the upcoming holidays by creating my Christmas layout now.  But first my tip, use Liquid Applique and a heat gun to create puffy snow on your winter layouts.

  • Cricut Cartridges:  Beyond Birthdays, Create a Critter 2, Plantin Schoolbook
  • Designer Paper:  My Mind's Eye Signature Christmas Holiday Glitter Book - 12" x 12"
  • Punch:  Marvy Snowflake
  • Twine:  Paper Studio
  • Accents:  Stickles.  Liquid Applique.  Foam Tape.


Scrapbook Layout Recipe:

  • Merry Christmas =  cut images and shadow at 2 3/4" from Cricut Beyond Birthdays cartridge; [merry] and [Christmas] found on page 122 of the folder.  Stickles added to candle.  Liquid Applique add for snowy effect.  White gel pen used for faux stitching.
  • Photo Mats = cut [red] at 4" x 6".  Cut [green] border at 4 1/4" x 6 1/4".
  • Snowy Bottom Border = hand tear white card stock.  Add Liquid Applique for snow.

  • Sleigh =  cut image at 4" (real dial size) from Cricut Create a Critter 2 cartridge; [Reindeer][Accessory] found on page 70 of the folder.  Liquid Applique added for snowy effect.  Stickles added to sleigh.
  • 2013 = cut at 3/4" from Plantin Schoolbook.  Liquid Applique added for snow.

  • Reindeer = cut five reindeer at 3.75" from Cricut Create a Critter 2 cartridge; [Reindeer] found on page 70 of the folder.  Cut one with a red nose for Rudolph; add stickles to his nose.  Liquid Applique added for snow.  Rudolph is attached with foam tape.  Use twine for reins.   

  • Christmas Tree = cut at 6" from Cricut Create a Critter 2 cartridge; [Reindeer][Icon] found on page 70 of the folder.  Stickles used on star.  Liquid Applique used for snow.

  • Christmas Wreath = cut at 2" from Cricut Create a Critter 2 cartridge; [Bird][Icon] found on page 69 of the folder.  Stickles used on bow.  Liquid Applique used for snow.  Image is mounted with foam tape.


  • Snow Flakes = punch from Marvy snowflake punch.  Add Liquid Applique for puffy snow.  Snowflakes are mounted with foam tape.

Thank you for visiting my blog today.  As always, comments are welcomed and appreciated!

~ Marilyn

Thursday, November 7, 2013

Squirrel Hugs

Hello, Friends! 

  • Cricut Cartridge:  Cindy Loo
  • Designer Paper:  American Crafts
  • Sentiment:  Scrappy Moms "Designers Choice"
  • Ribbon:  From Michaels

A2 sized card = 5.5" x 4.25"
Cricut Cindy Loo catridge
Card Recipe:
  • Mat 1 (brown) = 5 3/8" x 4 1/8"
  • Mat 2 (pattern) = 5 1/4" x 4"
  • Mat 3 (brown border) = 5 1/4" x 1 1/2"
  • Ribbon = from Michaels

  • Squirrel = cut at 3" from Cricut Cindy Loo cartridge; [Squirrel] found on page 62 of the folder.  Image is mounted with foam tape.
  • Sentiment = from Scrappy Moms "Designers Choice" stamp set.

Inside of Card:
  • Mat 1 (pattern) = 5 1/8" x 3 7/8".
  • Mat 2 (brown) = 5" x 3.75".
  • Mat 3 (beige) = 4.75" x 3.5".

Thanks for stopping by today!  As always comments are welcomed and appreciated!

~ Marilyn

Wednesday, November 6, 2013

Wheel Barrel of Flowers

Hello, Friends!  Here's a wheel barrel full of flowers to wish someone a happy birthday!

  • Cricut Cartridge:  Walk in My Garden
  • Designer Paper:  My Mind's Eye "Up & Away"
  • Punch:  Recollections Flower Punch
  • Sentiment:  TPC Studio "Greetings" stamp set
  • Accents:  Liquid Pearls
  • Other:  Tim Holtz Tea Dye Distress Ink

A2 sized card = 5.5" x 4.25"
Cricut Walk in My Garden
Card Recipe:
  • Mat 1 (green) = 5.25" x 4"
  • Mat 2 (pink pattern) = 5" x 4"
  • Sentiment = from TPC Studio "Greetings" stamp set.

  • Wheel Barrel = cut at 1.5" from Cricut Walk in My Garden cartridge; [whlbrw] found on page 107 of the folder.  Image is mounted with foam tape.  Flowers were cut twice, once in pink and once in green and layered together.  Liquid Pearls used in the center of the flowers.  White gel pen used for faux stitching.
  • Flowers = from Recollections flower punch.  Liquid Pearls used in the center of the flowers.

Inside of Card
Inside of Card:
  • Mat 1 (green) = 5" x 3.75"
  • Mat 2 (beige) = 4.75" x 3.5"
  • Corners = hand cut from scraps
  • Flowers = cut at 1.5" from Cricut Walk in My Garden cartridge; [whlbrw-s] found on page 107 of the folder.  Liquid Pearls used in the center of the flowers.

Thank you for stopping by my blog today.  As always, comments are welcomed and appreciated!

~ Marilyn

Monday, November 4, 2013

Koala Birthday

Hello, Friends!  Here's a quick birthday card I created using the Cricut ZooBalloo cartridge.

  • Cricut Cartridge:  ZooBalloo
  • Designer Paper:  My Mind's Eye "Sunshine" 6" x 6" pack
  • Sentiment:  TPC Studio "Greetings" stamp set.


A2 sized card = 5.5" x 4.25"
Cricut ZooBalloo cartridge
Card Recipe:
  • Mat 1 (blue) = 5 3/8" x 4 1/8"
  • Mat 2 (pattern) = 4.75" x 3.5".
  • Sentiment = from TPC Studio "Greetings" stamp set.


  • Letter K = cut image and shadow at 4" from Cricut ZooBalloo cartridge; [koala] found on page 92 of the folder.
  • Koala = cut image and shadow at 4" from Cricut ZooBalloo cartridge; [koala-s] found on page 92 of the folder.  Koala is mounted with foam tape.

Inside of Card:
  • Mat 1 (blue) = 4.75" x 3.5".
  • Mat 2 (white) = 4.5" x 3.25".


Thank you for visiting my blog today.  As always, comments are welcomed and appreciated!

~ Marilyn

Sunday, November 3, 2013

SBC - Challenge #5 - Sunburst

Hello, friends!  Our challenge today at Scrapbook Blessings Club is to create a Sunburst Card.  Our inspiration comes from Do Stamping with Dawn. 

  • Video Inspiration: Do Stamping with Dawn
  • Cricut Cartridge:  Mini Monograms
  • Designer Paper:  American Crafts
  • Twine:  Sew-Easy Floss
  • Stamp:  Peachy Keen Stamps PK-490 Everyday Character Face Assortment
  • Other:  Tim Holtz Tea Dye Distress Ink.  Pink chalk.  White gel pen.


A2 sized card = 5.5" x 4.25".
Cricut Mini Monograms cartridge
  • Select four different pieces of two-sided pattern paper.  Cut each at 1.5" x 4".
  • Cut each rectangle again on the diagonal.
  • Cut a card stock scrap at 5" x 2.75".  Mark center, then either glue or tape entire top. 
  • Starting at the center, place your triangle cuts.

  • Just to add interest, I added twine where each pattern touches.
  • Cut a background layer at 5 1/4" x 3".
  • Add accent where points meet.  I cut a scallop from Mini Monograms at 2.5" [crclsclp] found on page 129 of the folder.
  • Face on scallop is from Peachy Keen Stamps PK-490 Everyday Character Face Assortment.  White on eyes created using a white gel pen.  Pink cheeks created using chalk.

Inside of Card
Inside of Card:
  • Mat 1 (turquoise) = 5" x 3.75".
  • Mat 2 (beige) = 4.75" x 3.5".
  • Scallop = cut at 1.5" from Cricut Mini Monograms cartridge; [crclsclp] found onpage 129 of the folder.  Face is from Peach Keen Stamps PK-490 Everyday Character Face Assortment.  White on eyes created using a white gel pen.  Pink cheeks created using chalk.

Thank you for stopping by my blog today.  As always, comments are welcomed and appreciated!

~ Marilyn