Showing posts with label 01 Baby Gifts. Show all posts

Saturday, November 8, 2014

DIY Closet Dividers

Hello, Friends!  Today I'm sharing how to create clothes dividers for baby's closet.

Baby Closet Dividers


Here's hat You'll Need:

  • Blank Plastic Closet Rings.  I purchased 50 of them for $23.19 here.
  • Template for design.  You can find 3.5" templatWe designs all over the internet. Here's an example.
  • Designer Paper.  In my case, I used Square1 Printable.  
  • Mod Podge (unless using Square1 Printable)


Step 1:  Get the Blank Plastic Closet Divider Rings.

3.5" blank plastic closet dividers.  Purchased on Amazon.


Step 2:  Download 3.5" closet divider template.

Step 3:  Design, Print and Cut.

Open Template in Silhouette & Color Fill

Frame color-filled in gray.  Text uses "Precious" font.

Select and set cut style as "Cut Edge".  

Make sure Registration Marks are set on.  Then print and cut.

Step 4:  If you are using Designer Paper, you won't need to to the color-fill step above.  Attach your cut-on design to your blank divider using Mod Podge.  I made my designs on Square1 Printable, so I just peeled and pressed right on to the blank divider.

Note:  You'll need two of each size so that your finished closet divider will have a matching front and back.


The 3.5" dividers fit perfectly on my standard sized closet bars.  ~ Marilyn

Tuesday, June 10, 2014

Our Lady of Guadalupe - Baby Baptism Gift

Hello, Friends!  Marilyn here with a tutorial on heat transfers.  In this example, I'm using a baby onesie and an image of Our Lady of Guadalupe.


Some may know that my husband has a home-based Christian t-shirt business : www.gloryfactory.com (shameless plug)  


His t-shirts are created using heat transfers that many times are created for him via Transfer Express.   Last week he had a special order for a remodeling company that wanted an image of Our Lady of Guadalupe and the words "God Bless You" on the shirt pocket.  When the heat transfers arrived, he realized that the images were too large for a shirt pocket and reordered.   Soooo, long story to get to this point...  The images were too large for a shirt pocket, but would fit the front of a baby onesie.


Actually, the "God Bless You" part was too long for a onesie as well.  I had to cut it into sections to fit the front of the onesie.


Heat presses always arrive with heating instructions.  This image needed to be pressed at 365 degress for 4 seconds.  After heat pressing, you just pull the transfer off leaving the image on your clothing.


Here's the completed onesie.  I'll use this as a baptism gift.  It will work for either a boy or girl.

Another note:  I have a bunch of these clear boxes for A2 sized cards.  I just re-purposed it as a gift box for my onesie.

What do you have that can be re-purposed?

~ Marilyn

Saturday, May 3, 2014

Baby Bibs

Hello, Friends.  I love making my own gifts.  And it appears a baby boom is on the horizon.  I purchased a few blank bibs in pink, blue and red from TSC Apparel for $1.81 each.  Then purchased a design from Silhouette store for .99 and used a sheet of Square1 Printable Iron-On (approximately $2.22 per sheet).
For This Child I Prayed

  • Bib from TSC Apparel - $1.81 each
  • Silhouette Design #18733 - $ .99
  • Square1 Printable Iron-On - $2.22 per sheet.  I was able to print both on one sheet.
  • Total cost = $6.83 for both bibs or $3.42 each


  • First measure and determine how big you want your design.  I decided on 6" for these bibs.
Pre-heat heat press
  • Settings when using a heat press are: 325 degrees and 4 seconds.  This product can also be applied with a home iron.  I used heat press simply because we have a home based t-shirt business and it was available for me.
  • Press the bib alone without design first for 4 seconds.  
Silhouette settings
Silhouette process:
  • Select design and size to 6".  
  • Color fill with your choice of colors.  
  • I also added text "For This Child I Prayed"  
  • Group all together and set cut lines at Cut Edge.   
  • Add registration marks.  
  • Print on home printer.  
  • Cut with settings of Speed 5, Thickness 13, Blade 5.


Completed baby bib
  • Place Silhouette image onto pre-heated bib.  
  • Cover with teflon sheet and press for 4 seconds at 325 degrees.  

This really is a simple process.  If you already know how to do print and cut with the Silhouette, you are more than half-way there.

Thank you for visiting today! ~ Marilyn


Thursday, October 31, 2013

Iron-On Vinyl

Hello, friends.  Marilyn here with a product review of iron-on vinyl.  I have never used it before, so here we go...  My tip:  Never give up trying new things!  Such fun!
What is needed:
  • Iron-on vinyl.  I purchased mine at Hobby Lobby for $14.99.  What you get is one large sheet of glitter iron-on vinyl.  It is layered with a sticky clear sheet that is needed when applying the vinyl to your clothing.
  • Clothing to apply the vinyl onto.  I purchased a package of four baby onesies, sized 3-6 months.  Tip: Make sure to wash and dry the clothing before applying the vinyl.
  • Iron.  Set to cotton temperature.  Make sure the steam button is in the OFF position.
  • Cricut Image.  I used an image from Cricut Brooklyn Iron-on cartridge.

  • Place iron-on glitter vinyl on your mat and cut with blade set to 3, speed-low, pressure-medium.  My image came from Cricut Brooklyn Iron-on cartridge [bow-tie1] .  I cut it at 4".    Tip:  make sure your image has been "flipped" before cutting. 

  • Weed the vinyl - remove all the negative cut pieces.  Unlike regular vinyl, you will not need transfer tape for this product.

  • Iron your clothing for about 15 seconds before applying the vinyl.  It will pre-warm the clothing making it ready to receive the vinyl.  Set your iron to the cotton setting.  Make sure the steam button is in the off position.
  • Position your image and iron for about 30 seconds.  Turn the clothing over and iron on the backside for another 30 seconds. 
  • Lift up the clear coating to make sure everything sticks to the clothing.  If not, just iron a little longer. 

  • Remove all the clear plastic coating and admire your work. 

All-in-all I would give this product a thumbs-up.  Easy to use and really looks nice after applied.

  • Now I have a baby gift ready for wrapping.  Better make a card to go along with it.


A2 sized card
Cricut Brooklyn Iron-on cartridge
Card recipe:
  • Mat 1 (blue) = 5 3/8" x 4 1/8".
  • Mat 2 (white) = 4.75" x 3.5".  Mat embossed with Cuttlebug "Geometric" folder.
  • Mat 3 (white) = 4.75" x 3.5".  Hand cut at top in the center and fold down the corners to create a "collar."
  • Bow Tie and Buttons = cut at 4" from Cricut Brooklyn Iron-on cartridge [Bow Tie1]. 
  • Place form tape under collar corners to hold in place.

Inside of Card
Inside of Card:
  • Mat 1 (blue) = 4.75" x 3.5".
  • Mat 2 (white) = 4.5" x 3.25".
  • Sentiment = from Cloud9 Designs "Simple Thoughts" stamp set.
Just to be fair - Girl version. 

Girl Version - Iron-On Glitter Vinyl in Pink
  • Created by welding images from Forever Young and Brooklyn Iron-On.  Letter "K" from CCR Basics.
  • Forever Young = image from Forever Young [jewelry] is at 3".
  • Brooklyn Iron-On = image from Brooklyn Iron-On [Tie] is at 4".  Hide contour on tie part and keep the collar.
  • After cutting, cut again with Letter "K" at .5" from CCR Basics.
Onesie in Greeting Card Box


Thank you for visiting my blog today.  As always, comments are welcomed and appreciated!

~ Marilyn


Saturday, October 20, 2012

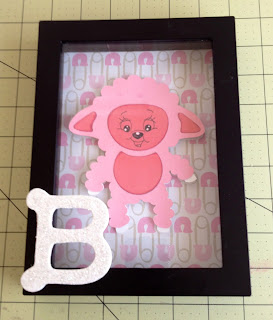
Baby Decor Shadow Boxes

Supplies:

Set of 4 Shadow Boxes = purchased at Michaels, 5" x 7" ($9.99 for set)

Glitter Letters = "B", "A", "B", "Y", purchased at Michaels, 2.75" (.98 cents each)

Two sheets of 12" x 12" baby decor paper = cut into four 5" x 7" sheets for shadow box background, purchased at Hobby Lobby.

Letters "B" were attached to outside of shadow box using 3M Scotch Quick Dry glue.  Letters "A" and "Y" were attached to outside of glass using Glossy Accents.

Owl = cut at 4.75" from Cricut Create a Critter cartridge, , page 25 of folder.   Leaf branch under owl's feet is from a Martha Stewart punch.

Cut two (seen in dark blue).   First cut is attached using Quick Dry glue.   Assemble rest of Owl and attach on top of first cut with Pop Dots to give 3D effect.

Giraffe = cut at 5" from Cricut Lite Sugar and Spice cartridge, , first column of folder.

Cut two (seen in light green).   First cut is attached using Quick Dry glue.   Assemble rest of Giraffe and attach on top of first cut with Pop Dots to give 3D effect.

Lamb = cut at 5" from Cricut Lite Sugar and Spice cartridge, , first column of folder.

Cut two (seen in white).   First cut is attached using Quick Dry glue.  Assemble rest of Lamb and attach on top of first cut with Pop Dots to give 3D effect.

Face on Lamb is a Peachy Keen stamp = PK-757 Wide Eyed and Bushy Tailed Face Assortment, 1 3/8".


Deer = cut at 5" from Cricut Create a Critter cartridge, , page 69 of folder.

Cut two (seen in dark brown).   First cut is attached using Quick Dry glue.   Assemble rest of Deer and attach on top of first cut with Pop Dots to give 3D effect.

Collar on deer has Stickles added to it.

Saturday, May 26, 2012

Cowboy Themed Time-Out Stool

Howdy Partner!


Time-out stool for Clive.   Stool is accented with a red bandana and comes with a baby shower card.   Cuts are from A Child's Year and Old West Cricut cartridges.   Blue twine used for the rope and yellow twine adds accent around the sheriff's badge.  Gold stickles used on spurs.   Glossy Accents used on sheriff's badge.

Sunday, May 6, 2012

Time Out Stool - Owl


Time Out Stool / Baby Gift.   Owl and tree branch are from Create a Critter Cricut cartridge (owl cut at 3.8" and branch at 4").   Background cloud paper from Best Friends Imagine cartridge (circle cut at 9.5").   Kite is also from Best Friends Imagine cartridge (cut at 2").


Blue twine added between kite and tree branch.  Red twine used to outline kite and yellow twine added to center of kite.

 "Silas" font is from Songbird Cricut cartridge - letters were welded together via Cricut Craft room.   Glossy Accents was added to top of kite.   Stickles added to "Silas", leaves and Owl.   Ribbon attached around side of stool using Tacky Glue.

Paper colors are from Best Friends Imagine cartridge.  Images were all attached using Mod Podge.

Friday, May 4, 2012

Picture This - Baby Gift

How adorable - how unique - how easy and inexpensive can this be!


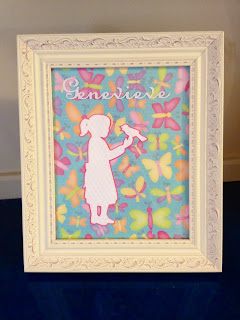
Honestly, it didn't take me 15 minutes to pull this baby shower gift together.   Genevieve's mother-to-be will love it.

I purchased the photo frame at Hobby Lobby using a 40% off coupon.   I believe I ended up paying less than $10 for it.   Also at Hobby Lobby I picked up a pretty sheet of paper to use for the background.

Back at home, I cut out the Girl and Bird image using white cardstock.   The image and pink shadow were both cut using A Child's Year Cricut cartridge (6.25").   I ran the white cut thru my Cuttlebug using the Swiss Dots folder.   Image was then glued to front of the background paper (that had been cut to 8" x 10").  

Inset into photo frame.

Next I went to the Cricut Craftroom (free application) and created a welded font text of "Genevieve" that I cut out in white vinyl.   Text was sized to be 6" long and created using the Songbird Cricut cartridge.   A simple application of the vinyl to the front of the glass using Transfer Tape and I can call it done!

** Update ** 

I decided that I wanted make a more 3D effect to this project.

Using some leftover background paper, I cut out one of the yellow butterflies and glued some light yellow twine outlining the wings.  

I also apply some Tacky Glue to rest of wings and sprinkled on glitter.


I attached to butterfly to outside of glass using Glossy Accents.   Also, applied Glossy Accents to pink center of butterfly.


I like the 3D look.

Sunday, April 15, 2012

Baby Decor ~ Boy


Baby Decor for a Boy:   The Boy and Sunflower were cut from A Child's Year at 6".


Closeup of Letter "P".   Cut using Storybook at 5 1/2 ".   Letter has been embossed using Cuttlebug Swiss Dots folder.


"Perry" is cut from vinyl using Songbird Cricut cartridge at 2.12 inches and has been placed on the outside of the glass.  I used the Cricut Craft Room to weld the letters together.


Total cost was around $10.   Frame found at Michaels on closeout.   Paper was on sale at Michaels for 14 cents.  This is an 8 x 10 frame.


Boy and Girl Pictures together. 

Saturday, April 14, 2012

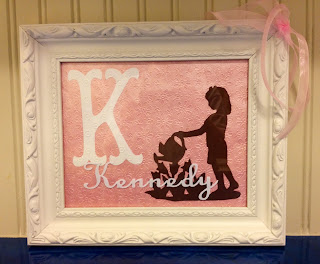
Baby Decor ~ Girl


Baby Decor Picture.   Girl watering flowers cut from A Child's Year Cricut cartridge.


Photo frame purchased at Hobby Lobby at 1/2 price.   Contents of photo removed and a pretty pink paper background was added.


Closeup of the large initial "K"; this was cut using Storybook Cricut cartridge.   Letter was embossed using Cuttlebug Daisy folder.


"Kennedy" cut from vinyl using Songbird Cricut cartridge.   Letters were welded together via Cricut Craft Room.   Vinyl letters are on top of the glass.


 Pink ribbon added to back for hanging.   Total cost around $11.00 :  Frame $10 (1/2 price cost), pink paper $1.20.   I already had vinyl and ribbon on hand.   This is an 8 x 10 picture frame.


Boy and Girl pictures together.