Showing posts with label Plantin Schoolbook. Show all posts

Friday, November 8, 2013

Christmas Scrapbook Layout

Hello, Friends.  I'm getting ready for the upcoming holidays by creating my Christmas layout now.  But first my tip, use Liquid Applique and a heat gun to create puffy snow on your winter layouts.

  • Cricut Cartridges:  Beyond Birthdays, Create a Critter 2, Plantin Schoolbook
  • Designer Paper:  My Mind's Eye Signature Christmas Holiday Glitter Book - 12" x 12"
  • Punch:  Marvy Snowflake
  • Twine:  Paper Studio
  • Accents:  Stickles.  Liquid Applique.  Foam Tape.


Scrapbook Layout Recipe:

  • Merry Christmas =  cut images and shadow at 2 3/4" from Cricut Beyond Birthdays cartridge; [merry] and [Christmas] found on page 122 of the folder.  Stickles added to candle.  Liquid Applique add for snowy effect.  White gel pen used for faux stitching.
  • Photo Mats = cut [red] at 4" x 6".  Cut [green] border at 4 1/4" x 6 1/4".
  • Snowy Bottom Border = hand tear white card stock.  Add Liquid Applique for snow.

  • Sleigh =  cut image at 4" (real dial size) from Cricut Create a Critter 2 cartridge; [Reindeer][Accessory] found on page 70 of the folder.  Liquid Applique added for snowy effect.  Stickles added to sleigh.
  • 2013 = cut at 3/4" from Plantin Schoolbook.  Liquid Applique added for snow.

  • Reindeer = cut five reindeer at 3.75" from Cricut Create a Critter 2 cartridge; [Reindeer] found on page 70 of the folder.  Cut one with a red nose for Rudolph; add stickles to his nose.  Liquid Applique added for snow.  Rudolph is attached with foam tape.  Use twine for reins.   

  • Christmas Tree = cut at 6" from Cricut Create a Critter 2 cartridge; [Reindeer][Icon] found on page 70 of the folder.  Stickles used on star.  Liquid Applique used for snow.

  • Christmas Wreath = cut at 2" from Cricut Create a Critter 2 cartridge; [Bird][Icon] found on page 69 of the folder.  Stickles used on bow.  Liquid Applique used for snow.  Image is mounted with foam tape.


  • Snow Flakes = punch from Marvy snowflake punch.  Add Liquid Applique for puffy snow.  Snowflakes are mounted with foam tape.

Thank you for visiting my blog today.  As always, comments are welcomed and appreciated!

~ Marilyn

Sunday, October 13, 2013

Happy Birthday!

Birthday card created for my daughter's upcoming birthday in November. 

  • Cricut Cartridges:  Plantin Schoolbook and Pretty Pennants
  • Designer Paper:  Recollections
  • Punch:  Martha Stewart balloon punch
  • Sentiment:  Inkadinkado "Humorous Birthday" stamp set.
  • Twine:  Friendship Twine (purchased at Walmart in children's craft section)

A2 sized card = 5.5" x 4.25"
Cricut Plantin Schoolbook
Cricut Pretty Pennants

Card Recipe:
  • Polka Dot Strips = cut each at 1" x 4".  I started out with a 4" x 5" square cardstock and attached each strip to it.  Then rounded the corners at 1/2" before mounting to the card base.
  • Pennant = cut at 2.25" x 4.5" from Cricut Pretty Pennants cartridge.  I used my Gypsy to resize the image; the Cricut Craft Room (free software) can also be used to do resizing.
  • Balloon = from Martha Stewart punch.  Image punched three times and layered together to create a chipboard effect.  Bow twine is Friendship Twine (purchased at Walmart in children's craft section).  Balloon image mounted with foam tape.
 
  • "happy" = letters cut at 1" using Cricut Plantin Schoolbook cartridge; [Roly Poly] feature used.  Each letter cut three times and layered together before attaching.  This gives the letters a chipboard effect.
  • Sentiment "Birthday!" = partial of "Happy Birthday" sentiment found on the Inkadinkado stamp set "Humorous Birthday."  I placed scotch tape over the "Happy" portion when inking.  Tape is then removed before stamping.

Inside of Card
Inside of Card:
  • Mat 1 (yellow polka dots) = 5" x 3.75".  Corners rounded at 1/2".
  • Mat 2 (white) = 4.75" x 3.5".  Corners rounded at 1/2".
  • Balloons = from Martha Stewart punch.

Thank you for joining me today!  As always, comments are welcomed and appreciated!

~ Marilyn


Friday, October 4, 2013

Garage Sale Layout

Hi friends!  Marilyn here with my second scrapbook layout.  After my first layout, I think I may be hooked! 

First, I have my tip of the day for you.... Scrapbooks are a addicting - in a good way!   If you scrapbook, you know what I'm talking about.


Garage Sale Layout


Here is what you need:
  • 12" scrapbook design paper.  Mine came from DCWV "The Crafty Stack."
  • Cricut cartridges:  Old West, Give a Hoot, Plantin SchoolBook
  • Cardstock:  black, blue, green
  • Twine
  • Glossy Accents
  • Foam Tape
  • Bling (gems, brads and such)
  • Adhesive
  • White gel pen, Black gel pen
  • Tim Holtz Tea Dye Distress Ink
  • Martha Stewart fence punch
  • Family Photos


Layout Recipe:

Page Banner
  • Cut a mat at 9" x 2 3/4".  Round bottom corners at 1/2".
  • Cut banner from Cricut Give a Hoot cartridge at 2" [BrdBnner][Border] found on page 43 of the folder.  Use black gen pen to create faux stitching around the banner flags.
  • Cut date numbers from Cricut Plantin SchoolBook cartridge at 3/4".  Attach to banner.  Add Glossy Accents to numbers.
  • Add a bead of glue to top of banner.  Attach Baker's Twine and let dry.  Add brads to each end of the twine.  

  • Center mat is cut at 6" x 5 1/2".  All corners are rounded at 1/2". 
  • Photos:  Each photo is layered with black cardstock; cut to size.
  • Name mats are cut at 1 3/4" x 3/4".  Names are handwritten with white gel pen.


Bottom Border
  • Mat cut at 1 3/4" x 8 3/4".  Top corners rounded at 1/2".
  • "SALE" = cut letters at 1 1/2" from Cricut Plantin SchoolBook cartridge.  Black mats under "SALE" were cut at 1 3/4" x 1 1/2".  Corners all rounded at 1/2".  Silver brads at top are from Imaginisce.   White gel pen used to create faux stitching. 
  • Arrow is a sticker
  • Sign and Grass were cut at 4" from Cricut Old West cartridge; [CntryGrl][Rope] found on page 67 of the folder.  Text is handwritten on sign.  Sign plaques are mounted with foam tape.  Silver brads are from Imaginisce.  Edges were inked with Tim Holtz Tea Dye Distress Ink.
  • Bottom border was cut at 11" x 2" before punching with Martha Stewart fence punch.
  • Journal mat cut at 6" x 5 1/2".  Corners rounded at 1/2".

I hope your enjoyed todays project, and as always, comments are appreciated.

Thank you for stopping by and Have a blessed day!

~ MARILYN 

Sunday, September 8, 2013

Wedding Towel Cake

Bridal Shower is tomorrow for my future daughter-in-law.  I purchased towels on her bridal registry and decided it would be more interesting and fun to give them in the form of a wedding cake.

Ingredients:
  • Towels:  2 bath, 1 hand, 1 finger tip purchased at Bed, Bath & Beyond
  • Cricut Cartridge:  Accent Essentials, Plantin SchoolBook, Storybook, Sweethearts
  • Punch:  Heart punch from Martha Stewart
  • Other:  Glimmer Mist "Iridescent Gold", Glimmer Mist "Lemon Zest", Glimmer Mist "Peach Delight", white tulle, gems, Stickles, corsage pins from Michaels, Popsicle Sticks from Michaels, green paint, hot glue.


Towel Cake
Towel Cake Recipe:
  • Bottom Layer:  Roll finger towel and 1 bath towel together.  Wrap the hand towel around and secure in back with corsage pins.
  • Top Layer:  Roll 1 bath towel.  Secure in back with corsage pins.
  • * Bath Towels are folder length-wise into fourths.
  • Tie white tulle around both layers.
  • Bells on bottom layer:  cut image and shadow at 2" from Cricut Sweethearts cartridge; [Bells] found on page 56 of the folder.  Gem glued to center of bow image.  Tie onto tulle with white twine.
  • Flowers = cut 20 each (all from white card stock):  one set at 2", one set at 1 3/4", one set at 1 1/2" - from Cricut Accent Essentials cartridge; [Accent24-s] found on page 54 of the folder.  Spray half of 2" and 1 3/4" flower cuts with Glimmer Mist "Iridescent Gold."  Spray other half or 2" and 1 3/4" flower cuts with Glimmer Mist "Lemon Zest."  Set aside to dry.  Spray all of the 1 1/2" flower cuts with Glimmer Mist "Peach Delight."  Set aside to dry.  Once dry, the flowers will be colored as white shimmer, yellow shimmer and peach shimmer.
  • Flower Stems = paint round popsicle sticks with green paint and set aside to dry.
  • Flower Leaves = cut at 10 (from green card stock):  one set at 1 3/4", one set at 1 1/2" = from Cricut Accent Essentials cartridge; [Accent41-s] found on page 72 of the folder.
  • Flower Assembly = bend each flower petal in the center.  Glue together one each: 2" in white, 1 3/4" in yellow, 1 1/2" in peach. Other flowers will be assembled as:  2" in yells, 1 3/4" in white, 1 1/2" in peach.  Glue gem to center of each flower.  Glue one leaf to back.   Attach to green popsicle stick using hot glue.  I chose to make some flowers without the 2" flower layer.

  • Poke the flower sticks around the bottom cake layer. 
  • Top flowers are attached with foam tape.
  • Car at top = cut image and two shadows at 3 3/4" from Cricut Sweethearts cartridge; [CarCuple] found on page 65 of the folder.  After assembled, hot glue a green popsicle stick to the back of the car's shadow.  Attach the second shadow to the back using foam tape around the popsicle stick.
  • Date on back of car = cut at 1/2" from Cricut Plantin SchoolBook.

Cake Board
Cake Board:
  • Flowers = cut seven flowers from white card stock at 1 1/2".  Spray with Glimmer Mist "Peach Delight."  Once dried, glue around edge of cake board.  Add a gem to the center.
  • Names "Jessica & Dave" = cut letters and shadows at 2" from Cricut Storybook cartridge.  Glue around edge of cake board.  Punch two small hearts and glue on either side of the "&" symbol.  Add stickles to "&" symbol.
  • Heart & Couple Silhouette = cut image and shadow at 5" from Cricut Sweethearts cartridge; [HeartCpl-s] found on page 40 of the folder.  
  • Text "I Do . . . " cut at 1" from Cricut Sweethearts cartridge; [Ido-s] found on page 60 of the folder.

Wednesday, August 14, 2013

3rd Grade Rules!

It's back to school time.  For both the students and the teachers.  My daughter-in-law teaches third grade at a local Catholic School.   Last Sunday I went to view how the room set-up was coming along.  While there, I spied a sad, old metal step stool that had been put out with the trash.  I don't have any pictures of the stool as found.


I took the metal stool back to my house and gave it a fresh paint job.  The legs were painted in a turquoise color and the seat portion were painted in red.


Paint colors used:
  • Krylon Aqua Ocean Breeze
  • Rustoleum Apple Red


I let the stool dry for 24 hours.  Next I coated the paint job with a mixture of Mod Podge Gloss and gold glitter (Martha Stewart Fine Glitter purchased at Michaels.)


After another 24 hours, I added some die cuts made with my Cricut.
  • Book = cut image and shadow at 8" from Cricut Locker Talk cartridge; [book] found on page 47 of the folder.
  • Ruler = cut at 3 1/2" (using fit to width feature) from Cricut Locker Talk cartridge; [ruler] found on page 41 of the folder.  The ruler cut only makes tick marks where the numbers and such should be.  I used a black gel pen and traced to make the numbers and the word inches.
  • Text = cut at 1 1/2" from Cricut Plantin SchoolBook cartridge.  The "r" and "d" were cut at 1".
  • All images were attached using Mod Podge Gloss / Gold Glitter mixture.


Once the Mod Podge dried, I gave everything a second coat of the Mod Podge Gloss / Gold Glitter mixture.  The next day, I gave the entire stool a coating of Tree House Clear Acrylic Gloss Coating.

I plan on returning this little stool tonight to the 3rd grade teacher.

Tuesday, April 16, 2013

Family Wall Decor

 
Having fun with my sister-in-law - she's crafty :-)
 
Papers for houses from
DCWV The Crafty Stack

This is my sister-in-law's family wall project.

And here's mine:

Papers for houses from
K&Company SW Spring Blossom

My sister-in-law was flipping through the March 2013 issue of Cricut Magazine when she came upon a cute Home Canvas project made by Kristen Swain (page 75 of magazine).  Anyway, we decided that we could do that too.  And we did!

Here's how to make your own.
  • Paint sides of a 8" x 10" canvas.
  • Lines on sides = drawn using a straight edge ruler.
  • Houses = cut at 1.25" from Cricut Handy Man Lite cartridge; on the folder.  Houses with text on pink version is mounted with foam tape.  Edges of houses on blue version inked with Tim Holtz Pealed Paint Distress Ink.  Edges of houses on pink version inked with Tim Holtz Tea Dye Distress Ink.
  • Text "FAMILY" = cut at .75" from Cricut Plantin SchoolBook cartridge.
  • Hearts = cut at .75" from Cricut Plantin SchoolBook cartridge; found on page 73 of folder.  Hearts on pink version mounted with foam tape.
  • Clouds = from EK Success punch.
  • Small hearts = from Martha Stewart punch.

Saturday, March 23, 2013

Super Hero Shelf

And BTW - I'm Published!  I can't tell you how excited I am to have my project published in Cricut Home Decor 2012 Idea Book (although it's really a magazine.)

My shelf is on pages 92-93.  Here's the layout:


I think the photographer did an excellent job.   Here's how the same shelf looks at my house.
   

Super Hero Shelf

Some closeup pictures (taken by me)
Letter "A" and Spaceship
Super Hero Dog
Super Hero Car and Letter "P"

This shelf was created for my two grandsons Andrew and Paul (hence initials "A" and "P"). They are both super hero fans. Andrew's favorite super hero is Captain America and Paul's favorite is Batman. Their mother Kristin convinced me to help her decorate their room in a Super Hero theme using Cricut cuts. It's been great fun. Since the shelf we have added bookends and wall art using Cricut cuts.

The editor's were able to condense my VERY DETAILED instructions down to just a half of a page.  Here is the instructions that I originally sent to them with the shelf:
  1. Paint shelf using Apple Barrel Bright Red acrylic paint (Two coats)
  2. Paint shelf hangers in four different colors:
    • Craftsmart Mediterranean Blue acrylic paint
    • Apple Barrel Spring Green acrylic paint
    • Apple Barrel Real Yellow acrylic paint
    • Apple Barrel Cloudless acrylic paint
  3. Initial "A"
    • Cut using green card stock from Plantin SchoolBook Cricut cartridge. Roly Poly on page 32of the handbook at 2.25 inches.
    • Attach to shelf using Mod Podge Gloss.
    • Once dried, accent with Inkssentials Glossy Acents.  I completely coated the letter using Glossy Accents.
  4. Orange Spaceship
    • Cut spaceship using orange card stock from Paper Doll Dress Up Cricut cartridge.  Accessories 3 <suprgl> on page 57 of handbook at 3 inches.
    • Cut lightening bolt for spaceship with yellow card stock from Paper Doll Dress Up Cricut cartridge. Accessories 3 <vmpris-s> on page 51 of handbook at 0.653 inches.  I used the Cricut Craftroom to make sure lightening bold would fit the spaceship.
    • Attach lightening bolt to spaceship using Zig 2 Way Glue.
    • Attach spaceship to shelf using Mode Podge Gloss.
    • Once dried, accent with Ranger Liquid Pearls in the Bisque color.
  5. Super Dog:
    • Cut red cape out of red glitter card stock from 3 Birds on Parade Cricut cartridge.  Layer 2 <Suprhero> on page 69 of handbook at 1.097 inches.  Use the Cricut Craftroom to size and make cuts.  Cut off the leading tie portion of the cape.
    • Cut the yellow symbol on cap from yellow glitter card stock from 3 Birds on Parage Cricut cartridge.  Layer 1 <Suprhero-s> on page 69 of the handbook at 0.5 inches.  Attach symbol to cape using Zig 2 Way Glue.
    • Cut shadow of Terrier out of black card stock from Create a Critter cartridge.  Shadow on page 34 of the handbook at 2.389 inches.
    • Cut 1st layer of Terrier out of brown card stock from Create a Critter cartridge.  Layer 1 on page 34 of handbook at 2.389 inches.
    • Cut another Layer 1 out of blue card stock at 2.389 inches.  Cut off the dog's feet to use as boots.
    • Cut 2nd layer of Terrier out of light tan card stock from Create a Critter cartridge.  Layer 2 on page 34 of handbook.  Real dial size for this cut is 1.556 inches.
    • Cut collar out of yellow glitter card stock from Create a Critter Cricut cartridge.  Layer 3 on page 34 of handbook.  Real dial size for this cut is 0.083 inches.
    • Cut mask out of blue card stock using the Raccoon from Create a Critter cartridge.  Layer 2 on page 33 of handbook.  Real dial size for this cut is 0.458 inches.  Use the Cricut Craft Room to assist in sizing.
    • Cut the super hero symbol out of red glitter paper from the Paper Doll Dress Up Cricut cartridge.  <suprby-s> on page 56 of the handbook.  Real dial size for this cut is 0.25 inches.  Use the Cricut Craft Room to assist in sizing.
    • Put the terrier together with Zig 2 Way Glue.  Add the raccoon mask and blue boots as well as the red cape to create the costume.
    • Attach to shelf using Mod Podge Gloss.
  6. Super Hero Car
    • Cut two circles out of silver glitter card stock using the Cricut Craft Room Basics (free).  Cut at 0.667 inches.  These will be used for the car wheels.
    • Cut the car out of black card stock using the Paper Doll Dress Up Cricut cartridge.  Accessories 3 <suprby-s> on page 56 of the handbook.  Cut at 2.208 inches.  Use the Cricut Craft Room to remove contour cut lines.
    • Cut lightening bolt for front of car out of yellow glitter card stock using the Paper Doll Dress Up Cricut cartridge.  Accessories 3 <vmpris-s> at 0.556 inches height x 1.875 inches width (resized using Cricut Craft Room).
    • Cut two flames for back of car out of yellow and orange glitter card stock using the Paper Doll Dress Up Cricut cartridge.  Accessories 3 >vmpris-s> at 0.361 inches height x 1.208 inches width (resized using Cricut Craft Room).
    • Attach flames and wheels to car using Zig 2 Way glue.
    • Accent car fin using Ranger Liquid Pearls Bisque.
    • Attach car to shelf using Mod Podge Gloss.
  7. Initial "P"
    • Cut using green card stock from Plantin SchoolBook Cricut cartridge.  Roly Poly on page 47 of handbook at 2.25 inches.
    • Attach to shelf using Mod Podge Gloss.
    • Once dried accent with Inkssentials Glossy Accents.  I completely coated the letter using Glossy Accents.
  8. Accent top portion of shelf:  make dots using Ranger Liquid Pearls Bisque color.
  9. Once everything is dry, spray the entire shelf as well as the cuts using Tree House Studio Clear Acrylic Gloss Coating.

Saturday, June 16, 2012

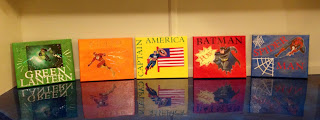
Batman Super Hero Wall Canvas

Batman Super Hero


Image downloaded from web and printed on regular ink jet printer.  Canvas painted and mod podged with Batman image and "BATMAN" letters.  POW background from Paper Doll Dress-Up Cricut cartridge.   All letters from Plantin Schoolbook Cricut cartridge.   Batman accented with stickles (belt).  POW background accented with Ranger Liquid Pearls and stickles.

Captain America Super Hero Wall Canvas

Captain America Super Hero


Image downloaded from web and printed on regular ink jet printer.  Canvas painted and mod podged with Captain America picture and "CAPTAIN AMERICA" letters.  Flag cut from My World Cricut cartridge.  Captain America image accented with stickles and Glossy Accents.  Letters cut from Plantin Schoolbook Cricut cartridge.

Spiderman Superhero Wall Canvas

Spiderman Super Hero


 Image scanned for picture I already had.   Spider webs from Mini Monsters Cricut cartridge (large web is 4", smaller image is 3").   Spiderman letters cut from Plantin Schoolbook Cricut cartridge.   Twine used to create web from hand of Spiderman to spider web.   Spider web also outlined in white twine.

Flash Superhero Wall Canvas

Flash Super Hero


Image downloaded from web and printed on regular ink jet printer.  Canvas painted and mod podged with Flash picture and "FLASH" letter.  Dots and lines drawn using Ranger Liquid Pearrls.  Letters accented with Stickles.

"FLASH" letters cut from Plantin Schoolbook Cricut cartridge.

Sunday, June 10, 2012

Green Lantern Wall Art

Green Lantern Super Hero - Wall Art


 Image downloaded from web and printed on regular ink jet printer.   Canvas painted and mod podged with Green Lantern picture and "Green Lantern" letters.  Dots and lines drawn using Ranger Liquid Pearls.   Letters accented with stickels.  Canvas is 8" x 10" in size.

Tuesday, June 5, 2012

Super Hero Book Ends

Calling all Super Heros!

This was such a fun project to make.   It's rather simple, but time consuming.

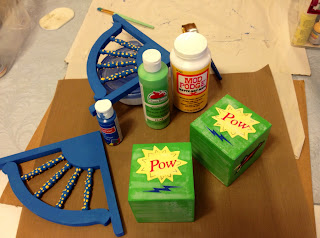
First I purchased two 3 1/2 inch wood blocks from Michaels and one fan corner bracket at Lowes (package has both fans needed).


Paint and mod podge images.


Here are the images I used:


1.   Super Boy - cut from Paper Doll Dress-Up Cricut cartridge.   Letter "P" from Plantin Schoolbook.  Face on boy from Peachy Keen stamps.

2.  Super Dog - cut from Create a Critter Cricut cartridge (Terrior).   Mask is from the racoon on Create a Critter.   Cape is from 3 Birds on Parade.   I cut an additional Terrior in all blue and trimmed to get his boots.

3.  Pow - yellow part from Paper Doll Dress-Up (super boy cut accessory).  Blue lightening from Paper Doll Dress-Up (vampire cut accessory).  "POW" font from Plantin Schoolbook.


4.  Yellow lightening - Paper Doll Dress-Up (super boy cut accessory).

5.  Orange space ship - Paper Doll Dress-Up (super girl cut accessory).  Blue lightening from Paper Doll Dress-Up (vampire cut accessory).

6.  Black Car - Paper Doll Dress-Up (super boy cut accessory).  Silver wheels on car are a circle cut.   Orange and yellow lightening / flames are from Paper Doll Dress-Up (vampire cut accessory).  "P" on car from Plantin Schoolbook.


Fans painted blue.   Yellow paint dabbed in spots along "rays".


Attached decorated block to fan.   I attached using E-6000 glue.   Once dried I also hammered a finishing nail in thru back side.


Finished look.   Stickles were also added to bling it up a bit.


Once everything was dry, I sprayed the bookends with a clear acrylic coating.

Sunday, June 3, 2012

Super Hero Room Decor

Super Paul has some new designs coming to his bedroom!

Super hero created at 10.5 inches from Paper Doll Dress Up Cricut cartridge. "P" fonts on super boy and car from Plantin Schoolbook. Dog cut at 5 inches from Create a Critter Cricut cartridge. His mask came from the racoon cut on same cartridge. Dog's cape is from 3 Birds on Parade. Car is from Paper Doll Dress-Up cartridge. Flames on car are from the vampire cut on same cartridge.


Face on super boy were hand drawn.