Showing posts with label Vinyl craft. Show all posts

Thursday, October 31, 2013

Iron-On Vinyl

Hello, friends.  Marilyn here with a product review of iron-on vinyl.  I have never used it before, so here we go...  My tip:  Never give up trying new things!  Such fun!

What is needed:
  • Iron-on vinyl.  I purchased mine at Hobby Lobby for $14.99.  What you get is one large sheet of glitter iron-on vinyl.  It is layered with a sticky clear sheet that is needed when applying the vinyl to your clothing.
  • Clothing to apply the vinyl onto.  I purchased a package of four baby onesies, sized 3-6 months.  Tip: Make sure to wash and dry the clothing before applying the vinyl.
  • Iron.  Set to cotton temperature.  Make sure the steam button is in the OFF position.
  • Cricut Image.  I used an image from Cricut Brooklyn Iron-on cartridge.

  • Place iron-on glitter vinyl on your mat and cut with blade set to 3, speed-low, pressure-medium.  My image came from Cricut Brooklyn Iron-on cartridge [bow-tie1] .  I cut it at 4".    Tip:  make sure your image has been "flipped" before cutting. 

  • Weed the vinyl - remove all the negative cut pieces.  Unlike regular vinyl, you will not need transfer tape for this product.

  • Iron your clothing for about 15 seconds before applying the vinyl.  It will pre-warm the clothing making it ready to receive the vinyl.  Set your iron to the cotton setting.  Make sure the steam button is in the off position.
  • Position your image and iron for about 30 seconds.  Turn the clothing over and iron on the backside for another 30 seconds. 
  • Lift up the clear coating to make sure everything sticks to the clothing.  If not, just iron a little longer. 

  • Remove all the clear plastic coating and admire your work. 

All-in-all I would give this product a thumbs-up.  Easy to use and really looks nice after applied.

  • Now I have a baby gift ready for wrapping.  Better make a card to go along with it.


A2 sized card
Cricut Brooklyn Iron-on cartridge
Card recipe:
  • Mat 1 (blue) = 5 3/8" x 4 1/8".
  • Mat 2 (white) = 4.75" x 3.5".  Mat embossed with Cuttlebug "Geometric" folder.
  • Mat 3 (white) = 4.75" x 3.5".  Hand cut at top in the center and fold down the corners to create a "collar."
  • Bow Tie and Buttons = cut at 4" from Cricut Brooklyn Iron-on cartridge [Bow Tie1]. 
  • Place form tape under collar corners to hold in place.

Inside of Card
Inside of Card:
  • Mat 1 (blue) = 4.75" x 3.5".
  • Mat 2 (white) = 4.5" x 3.25".
  • Sentiment = from Cloud9 Designs "Simple Thoughts" stamp set.
Just to be fair - Girl version. 

Girl Version - Iron-On Glitter Vinyl in Pink
  • Created by welding images from Forever Young and Brooklyn Iron-On.  Letter "K" from CCR Basics.
  • Forever Young = image from Forever Young [jewelry] is at 3".
  • Brooklyn Iron-On = image from Brooklyn Iron-On [Tie] is at 4".  Hide contour on tie part and keep the collar.
  • After cutting, cut again with Letter "K" at .5" from CCR Basics.
Onesie in Greeting Card Box


Thank you for visiting my blog today.  As always, comments are welcomed and appreciated!

~ Marilyn


Wednesday, October 30, 2013

Decorative Vinyl Tray

Hello, Friends!  Marilyn here with a tutorial on using vinyl to create a decorative tray.  My tip:  Measure Twice, Cut Once... not original but definitely applies when cutting vinyl.

Here is what I used:
  • Vinyl - silver vinyl.  I ordered this through eBay.
  • Transfer Tape. 
  • Tray - black wooden tray I found on sale at Michaels two years ago. 
  • Cricut Cartridge - Songbird. 


  • First step is to measure the tray and determine what size font will fit.
 
Cricut Craft Room software
  • In the Cricut Craft Room (CCR), I selected the font text from Songbird Cricut Cartridge.  I changed the Letter Spacing to -22 in order to weld the letters together.  I then made the length 9.9".
  • Next, I cut the font text out using card stock to make sure I was happy with the size.

  • Once satisfied with the sizing, I cut the font text using vinyl. 
  • Settings for cutting vinyl:  blade 3, speed low, pressure medium

  • Weed and remove all the negative cuts.

  • Place transfer tape over the weeded vinyl.  Rub with the tool provided in the vinyl to make sure everything is attached.

  • Remove from Cricut mat and place vinyl onto the tray using the transfer tape.  Rub well with the tool provided.

  • Remove the transfer tape.  Pulling at an angle is the easiest method.

  • And there you go. 

  • Angels always makes my name look nicer.


Thank you for joining me today.  I hope you enjoyed the tutorial.  As always, comments are welcomed and appreciated!

~ Marilyn

Saturday, December 22, 2012

Monogram Hairbrushes With Shrinky Dinks Charms

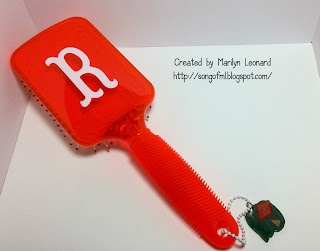
 I purchased these four Conair hairbrushes at Walmart for $3.98 each.   I liked the fact that they had a nice flat back - perfect for adding a monogram.


Initial monograms in white vinyl.   Initials were cut at 2.5" using Cricut Storybook cartridge.


Adding Shrinky Dinks Charms!   Images printed and cut at 2.5" using Cricut Imagine Best Friends cartridge.   Above picture is before shrinking in the oven (325 degrees for 3 minutes.)  Place images on a cookie sheet with brown sack underneath.   Images need to be baked printed side down.

When printing / cutting on Cricut Imagine, make sure to print on the ruff side to prevent streaking.   Also, when complete the image will be reversed.  As seen above, images with text were backwards - I should have "flipped" the image before printing on the Imagine to correct the issue.

Additionally, I punched a 3/16" hole at the top of each charm before placing in the oven.


Shrinky Dinks after coming out of the oven.   Charms shrink down to 1/3 of original size.


Purple hairbrush with charm added.  The purple ball chain was purchased at Hobby Lobby for $1.47.  Original chain was much longer; I cut to desired size using regular scissors.

Jump ring was added thru charm to enable attachment to chain.

I also added Mod Podge Dimensional Magic to top of charm to give it the extra thickness and shine.   Make sure the jump ring is in the charm before adding the Mod Podge Dimensional Magic.  Allow the charm about 3 hours to dry before handling.


Pink monogram hairbrush with charm.


Orange monogram hairbrush with charm.


Blue monogram hairbrush with charm.

Sunday, April 15, 2012

Baby Decor ~ Boy


Baby Decor for a Boy:   The Boy and Sunflower were cut from A Child's Year at 6".


Closeup of Letter "P".   Cut using Storybook at 5 1/2 ".   Letter has been embossed using Cuttlebug Swiss Dots folder.


"Perry" is cut from vinyl using Songbird Cricut cartridge at 2.12 inches and has been placed on the outside of the glass.  I used the Cricut Craft Room to weld the letters together.


Total cost was around $10.   Frame found at Michaels on closeout.   Paper was on sale at Michaels for 14 cents.  This is an 8 x 10 frame.


Boy and Girl Pictures together. 

Saturday, April 14, 2012

Baby Decor ~ Girl


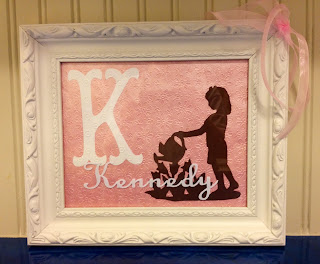
Baby Decor Picture.   Girl watering flowers cut from A Child's Year Cricut cartridge.


Photo frame purchased at Hobby Lobby at 1/2 price.   Contents of photo removed and a pretty pink paper background was added.


Closeup of the large initial "K"; this was cut using Storybook Cricut cartridge.   Letter was embossed using Cuttlebug Daisy folder.


"Kennedy" cut from vinyl using Songbird Cricut cartridge.   Letters were welded together via Cricut Craft Room.   Vinyl letters are on top of the glass.


 Pink ribbon added to back for hanging.   Total cost around $11.00 :  Frame $10 (1/2 price cost), pink paper $1.20.   I already had vinyl and ribbon on hand.   This is an 8 x 10 picture frame.


Boy and Girl pictures together.

Monday, April 9, 2012

Wedding Gifts ~ Glass Etching


Wedding gifts & card. Glass etching on glasses were from stencil made using Storybook Cricut cartridge.


Cards created using Sweethearts Cricut cartridge. Card on right "His and Her Towels" is one of a set of 8 thank-you cards. The lace at bottom of card is actually paper that was punched from a Martha Stewart punch.


The part that took the longest to create were these little pink rose buds on the package. Each rose bud was created by combining six flowers (cut at one inch) from the Accent Essentials Cricut cartridge. The leaves are from a punch.

Friday, December 30, 2011

Monogram Coasters

Aren't these pretty?   I created these coasters as a Christmas gift for my brother.   They came out so well, I may make more for myself.

Here's how they are made:

Supplies
1.  Glass tiles bought at Home Depot. (four tiles)
2.  Glass etching cream (available at craft stores)
3.  Cricut cartridge Songbird to create stensils.
4.  Cork self-stick roll bought at craft store.
5.  Vinyl

Instructions:
Cut designs from Songbird onto vinyl.   Place vinyl on glass tiles and cover top of tile with etching cream.   I waited for 45 minutes then washed cream off in the sink under running water.   Cut cork and stick to back of tiles.

Friday, April 15, 2011

Bridal Shower for Jennifer Leonard - soon to be - Andrews

My husband's niece is engaged to be married July 9, 2011.   I did some Cricut / Glass Etching / Vinyl crafting for her upcoming Bridal Shower.


The flutes have the initial "A" etched on them.   Candle holder has initials "mAj" etched (Myron / Andrews / Jennifer).  Black tub has white vinyl "Andrews" added.  

Also, made the card with Bride in front of argyle background.   Bride's dress has been embossed with Cuttlebug swiss dots.   There's more bling on the card, but doesn't seem to show up in this photo.

Saturday, April 9, 2011

Becky's Getting Married

The big news at my work place is about Becky.   Becky is everyone's friend.   She loves everyone and everyone loves Becky.   Anyway, Becky just got married last Friday, April 8, 2011.    I kicked into my "Crafting Mode" and made a banner for one of her bridal showers.


 I also made this tile for her.   I placed it on her desk at the office for her to see when she returns.   Hopefully, she'll like it.   All things for Becky are a labor of love.

Marilyn's Cricut Crafts

April 9, 2011 - I'm starting my own craft page.   Not because I'm such an awesome crafter; in fact I only started a couple of months ago after I purchased my Cricut Expression via Walmart.    I'm starting this blog so as to not "spam" my Facebook friends with constant "Look What I Just Made!" images.

Also, I would like to participate with some of the other Cricut crafters out there who do "blog hops"... (maybe)

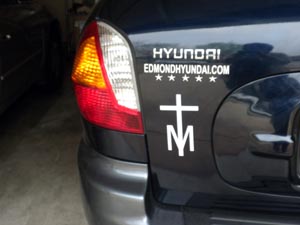
Anyway, here I go.   First car decal.  Made out of vinyl and cut using SCAL program on my Cricut.